Everything I've seen so far about Foundation Models
A hands-on tour of Apple's Foundation Models: on-device LLMs, why they matter, streaming, structured output, and the new agentic primitives from WWDC26.
Introduction
Confession time! I slept on Apple’s Foundation Models when it first dropped. I was deep in outsource client works at the time, and there’s basically an unwritten law in that world, if it doesn’t run on iOS, Android, and the web, it doesn’t exist. Foundation Models is strictly Apple-only, or, specifically Apple Silicon-only. So I filed it under “not my problem right now” and moved on.
Then WWDC26 happened, and suddenly Foundation Models tweets are everywhere. That felt like a signal. And this year’s announcements made it even harder to ignore — Apple open-sourced the Foundation Models framework at WWDC26, which means we can interact with LLMs on anywhere Swift runs, including Linux servers. Cloud model providers like Google Gemini and Anthropic Claude are announcing their official support for Foundation Models framework, that is, you can interact with their models natively just like you would interact with Apple’s on-device AI models. Even more, they shipped a set of new primitives specifically designed for building agentic experiences: native system tools, dynamic instructions, dynamic profiles, and many open source packages. It’s no longer just a “make my text field smarter” API. It’s a full toolkit for building AI agents beyond on device, that can reason, act, and course-correct.
So I finally sat down, rolled up my sleeves, and started digging. This article is my guided tour of what I found so far, starting from “why does on-device AI even matter?” all the way to tools, streaming, structured output and what not. Let’s go.
What is an On-Device LLM?
When you think of ChatGPT or Claude, you’re thinking of cloud-based models. These are massive, often hundreds of billions of parameters, and they need entire server farms of power-hungry GPUs to run. Every time you send a prompt, your text leaves your device, travels across the internet to a data centre, gets processed, and the response bounces back to you.
An on-device LLM skips all of that. The model lives directly in the silicon of the user’s device, their iPhone, iPad, or Mac, and runs entirely locally. No round-trips. No servers.
But there’s an obvious catch 🤔, you can’t just squeeze a 100-billion-parameter model onto an iPhone of should you? It would crash from memory exhaustion instantly and drain the battery in minutes.
Think of parameters as millions of tiny, adjustable dials inside a giant mathematical formula. More dials -> smarter model -> more memory required.
Apple’s answer is quantisation, compressing those dials from 32-bit floats down to 4-bit integers. This shrinks a 3-billion-parameter model to roughly 1.5–1.8 GB, small enough to sit comfortably alongside your running app in Unified Memory, and fast enough to be handled by the Apple Silicon Neural Engine (NPU) in near-real-time. I know those are such a mouthful words, I also learned it from the Google so feel free to skip them unless you are into… you know those kind of stuffs.
Why do you want an On-Device LLM?
I can think of four reasons. Big ones
It’s free to run. If your app goes viral while relying on a cloud LLM, your API bill scales right along with your user base. 100,000 users querying a model thousands of times a day? That can easily run into thousands of dollars per month. With the FoundationModels framework, the compute is paid for by the user’s own hardware. Your marginal cost per query is exactly $0.00.
Privacy by default. With an on-device model, needless to say, data never leaves the device sandbox. User inputs, outputs, conversation history, all of it stays local.
Works offline. No internet? No problem. The model is right there on the chip.
Feels instant. No network queue to wait on means tokens start streaming almost immediately after the user hits send.
That said, none of this comes for free. The models are trained and owned by Apple, the same ones powering Apple Intelligence, so you can’t fine-tune them for your brand, swap them out, or use them on Android. If your product needs a custom-trained model or cross-platform support, Foundation Models won’t cut it. You’d have to ship your own model bundled inside the app, or if the model is too large for that, fall back to a cloud-hosted approach and talk to it over the network like any other API. Foundation Models is a great fit when Apple’s general-purpose model is good enough for your use case, and for a lot of features, it is.
Intro to Foundation Models Framework
The FoundationModels framework is the developer-facing API that sits on top of Apple Intelligence. It lets you tap into those on-device models to make your app’s features smarter, not by replacing your app logic, but by enhancing it. Imagine, turning a static, rule-based feature into something that adapts and feels personal.
Hello, Foundation Models
import FoundationModels
import Playground

#Playground {
    let session = LanguageModelSession()
    let response = try await session.respond(to: "What is FoundationModels")
}
One of the first things you’ll notice is the #Playground macro. It gives you a SwiftUI-style live preview for your AI prompts, so you can iterate without running the full app every time.
Once you attach #Playground, a preview panel appears. If it doesn’t open automatically, hit CMD + Option + P. You’ll see something like this
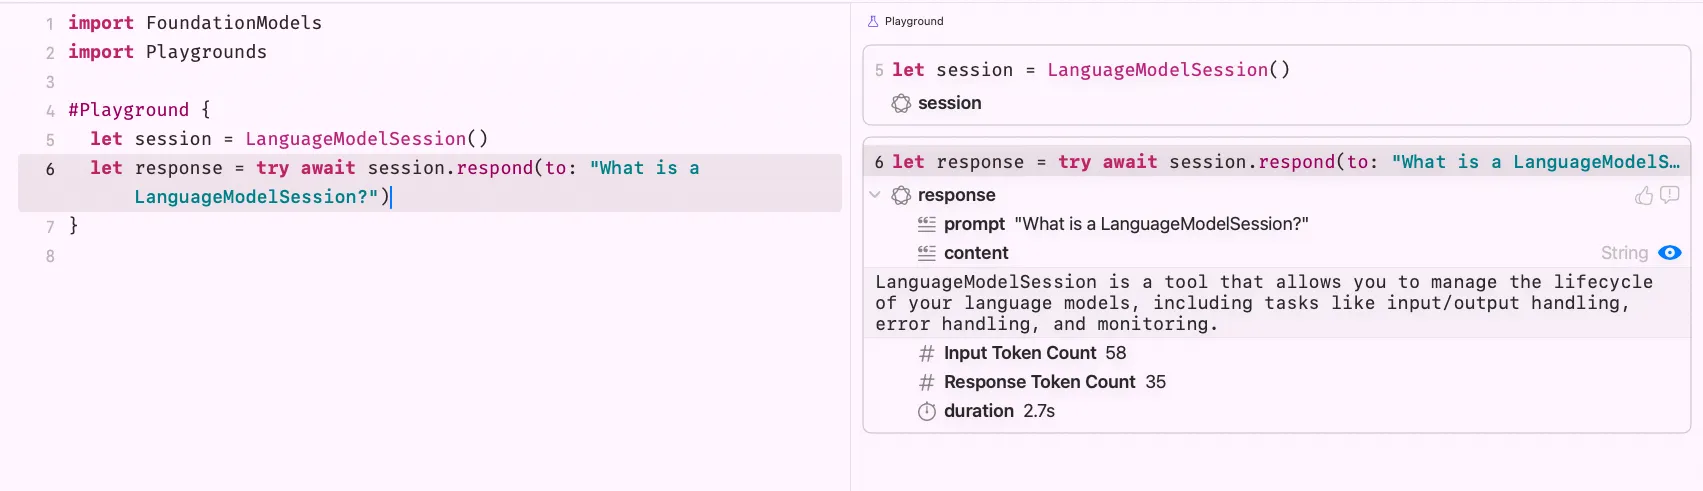
The model’s answer probably isn’t mind-blowing yet 😅 but this is our handshake with Foundation Models. We’re in.
Now, let’s zoom in on LanguageModelSession. Apple’s documentation puts it this way
A session is a single context that you use to generate content with, and maintains state between requests. You can reuse the existing instance or create a new one each time you call the model. When creating a session, provide instructions that tell the model what its role is and provide guidance on how to respond.
In simpler terms, a session is like a conversation thread. It remembers what was said earlier. Let’s actually test that:
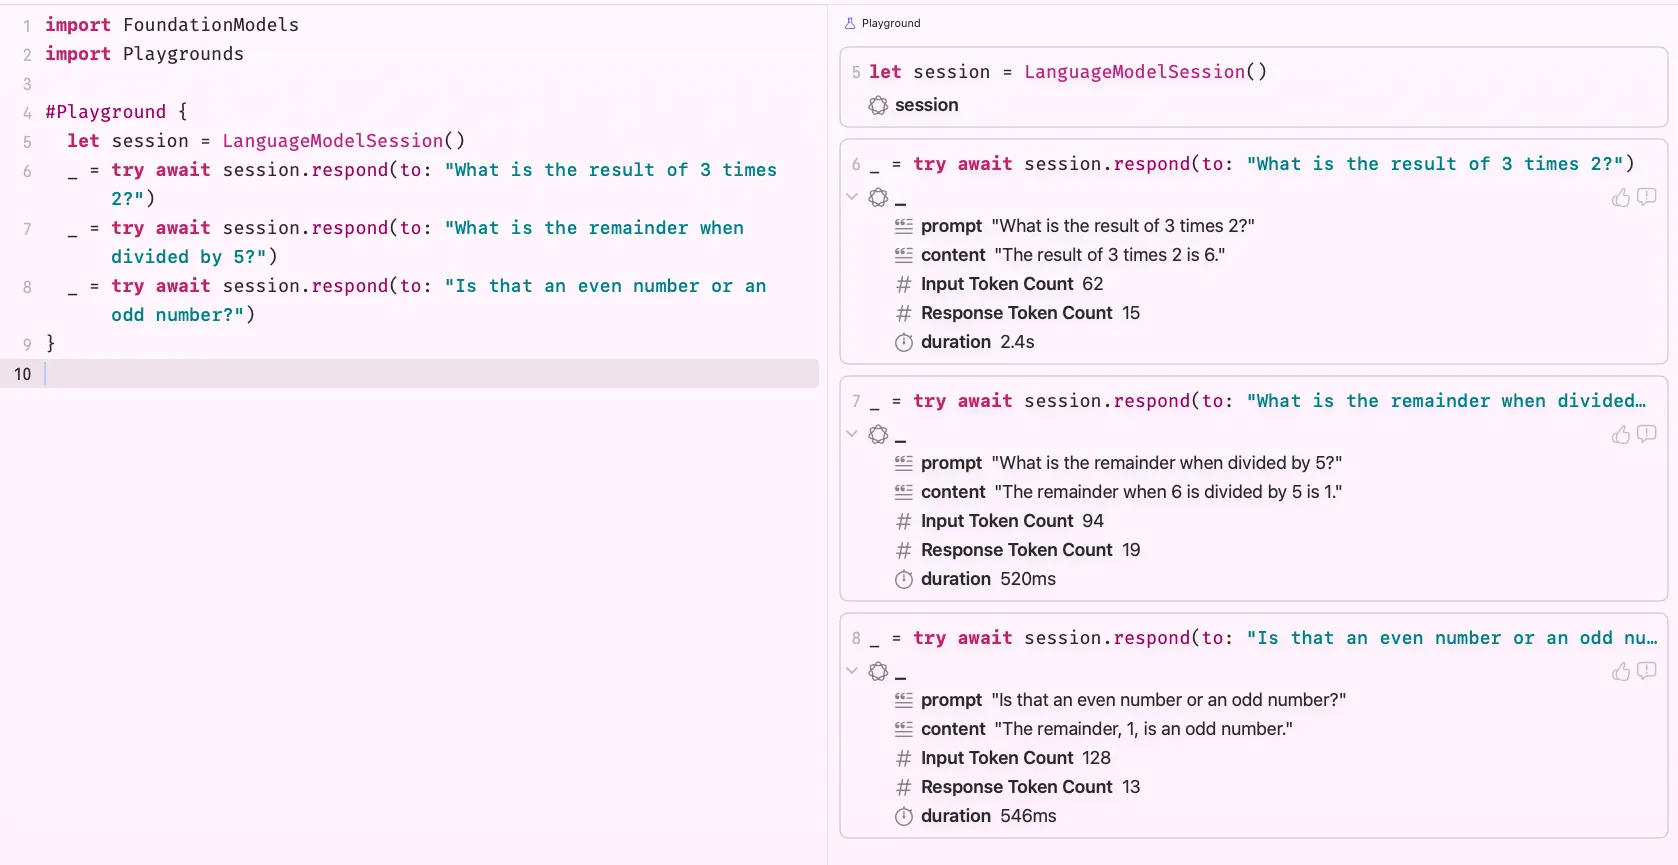
When I ask the model to calculate based on a number from a previous response, it handles it correctly, it maintained context across prompts within the same session. Now let’s see what happens when we switch to a fresh session:
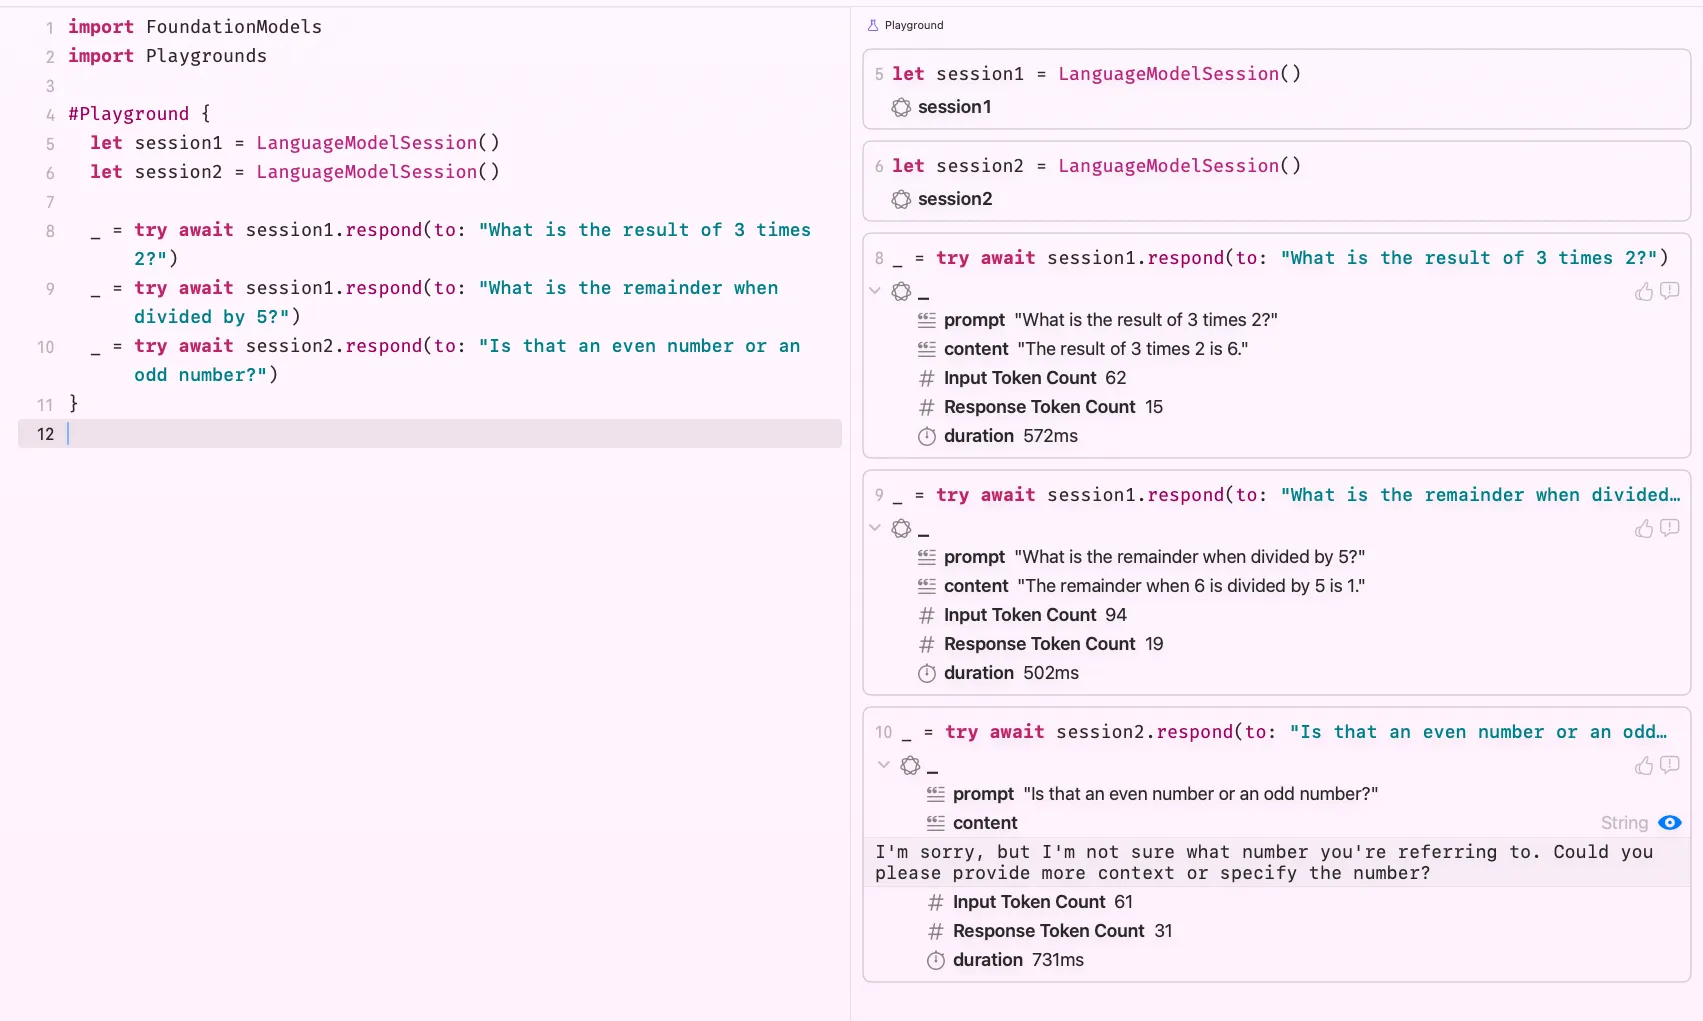
Through lines 8 and 9, I’m reusing session1. On line 10, I switch to a new session and just like that, the context is gone. The model replies: “I’m sorry, but I’m not sure what number you’re referring to…” Exactly what you’d expect.
Sessions are scoped. Keep that in mind as you build.
Checking Availability
Before you get too excited, we need to do a reality check. Not every Apple device supports Foundation Models for obvious reasons. The framework requires Apple Silicon, and Apple Intelligence needs to be enabled on the device. Some of your users won’t meet those requirements, and the last thing you want is a broken experience for them.
Always check availability before showing any AI-powered feature
#Playground {
    let model = SystemLanguageModel.default

    switch model.availability {
    case .available:
        print("We're good to go!")
    case let .unavailable(reason):
        switch reason {
        case .deviceNotEligible:
            print("Device is not eligible.")
        case .appleIntelligenceNotEnabled:
            print("Enable Apple Intelligence in Settings.")
        case .modelNotReady:
            print("Model is still downloading, or the device has insufficient storage.")
        @unknown default:
            print("Something unexpected happened.")
        }
    }
}
The cases are fairly self-explanatory. Device not eligible, nothing you can do, just hide the feature gracefully. If Apple Intelligence not enabled, nudge the user toward Settings. Model not ready, it’s probably still downloading, or the device is low on storage.
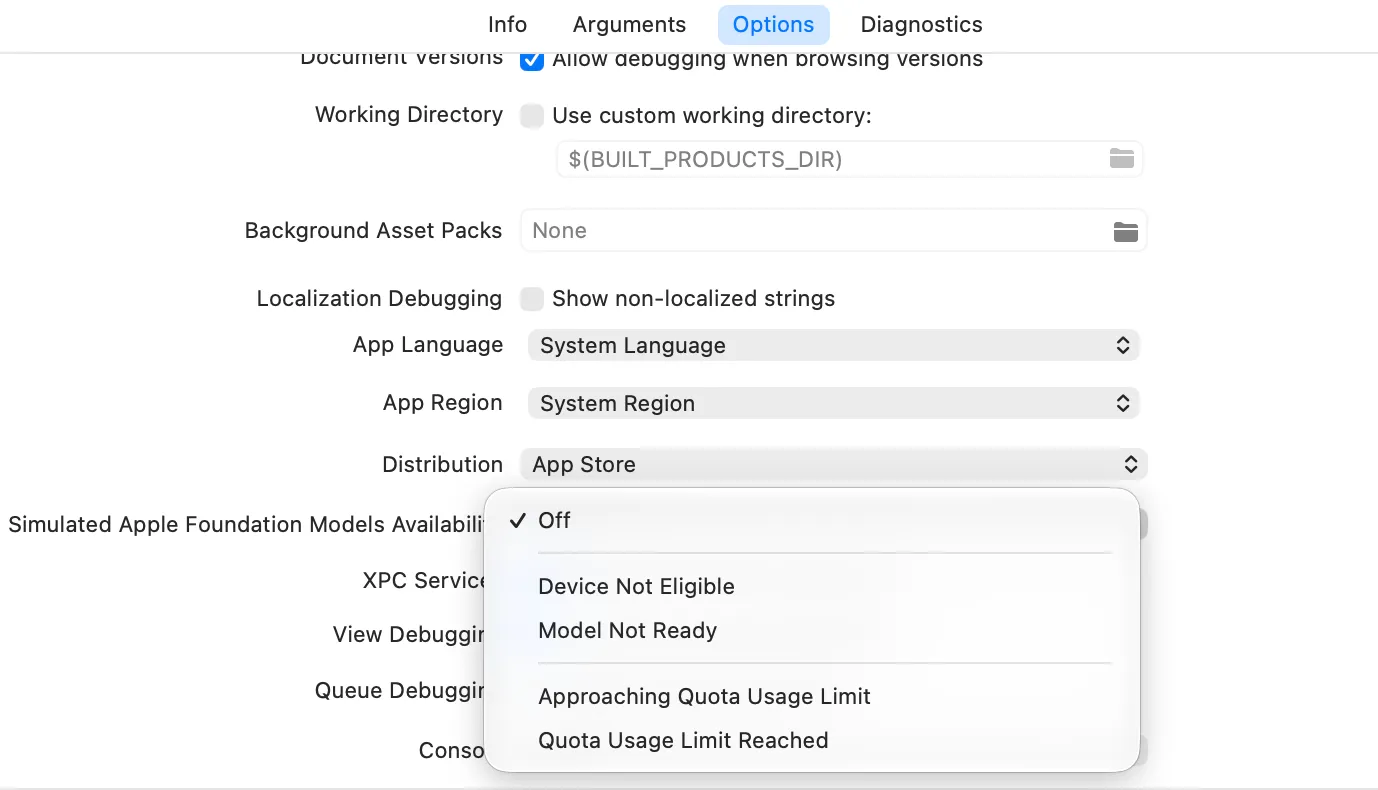
You can simulate all these states in Xcode via Edit Scheme > Run > Options > Simulated Apple Foundation Models Availability. Very handy for testing every edge case without needing different physical devices.
Zoom in to the Model a Little Bit
We’ve been calling SystemLanguageModel.default without thinking much about it. Let’s actually look at what that thing is, because there’s more going on than the name implies.
SystemLanguageModel represents the underlying on-device model itself, separate from the session. The session is your conversation layer; the model is the brain behind it. And Apple ships more than one flavour.
The default model is a general-purpose adapter. It’s great at open-ended tasks like answering questions, following instructions, generating text. It’s what you reach for when you don’t know exactly what the model will be asked to do.
But Foundation Models also ships specialised adapters, lightweight models fine-tuned for a specific task. They’re smaller, faster, and more reliable within their lane because they’ve been optimised to do one thing well instead of everything adequately.
When you take a closer look at its initialiser, you will see you can define adapter, guardrails or useCase.

The one you’ll encounter most often is the content tagging adapter, which is designed to extract topics, labels, or classifications from a piece of text. Let’s create a model with content tagging usecase.
let model = SystemLanguageModel(
	useCase: .contentTagging,
	guardrails: .default
)
Now, let’s see it in action
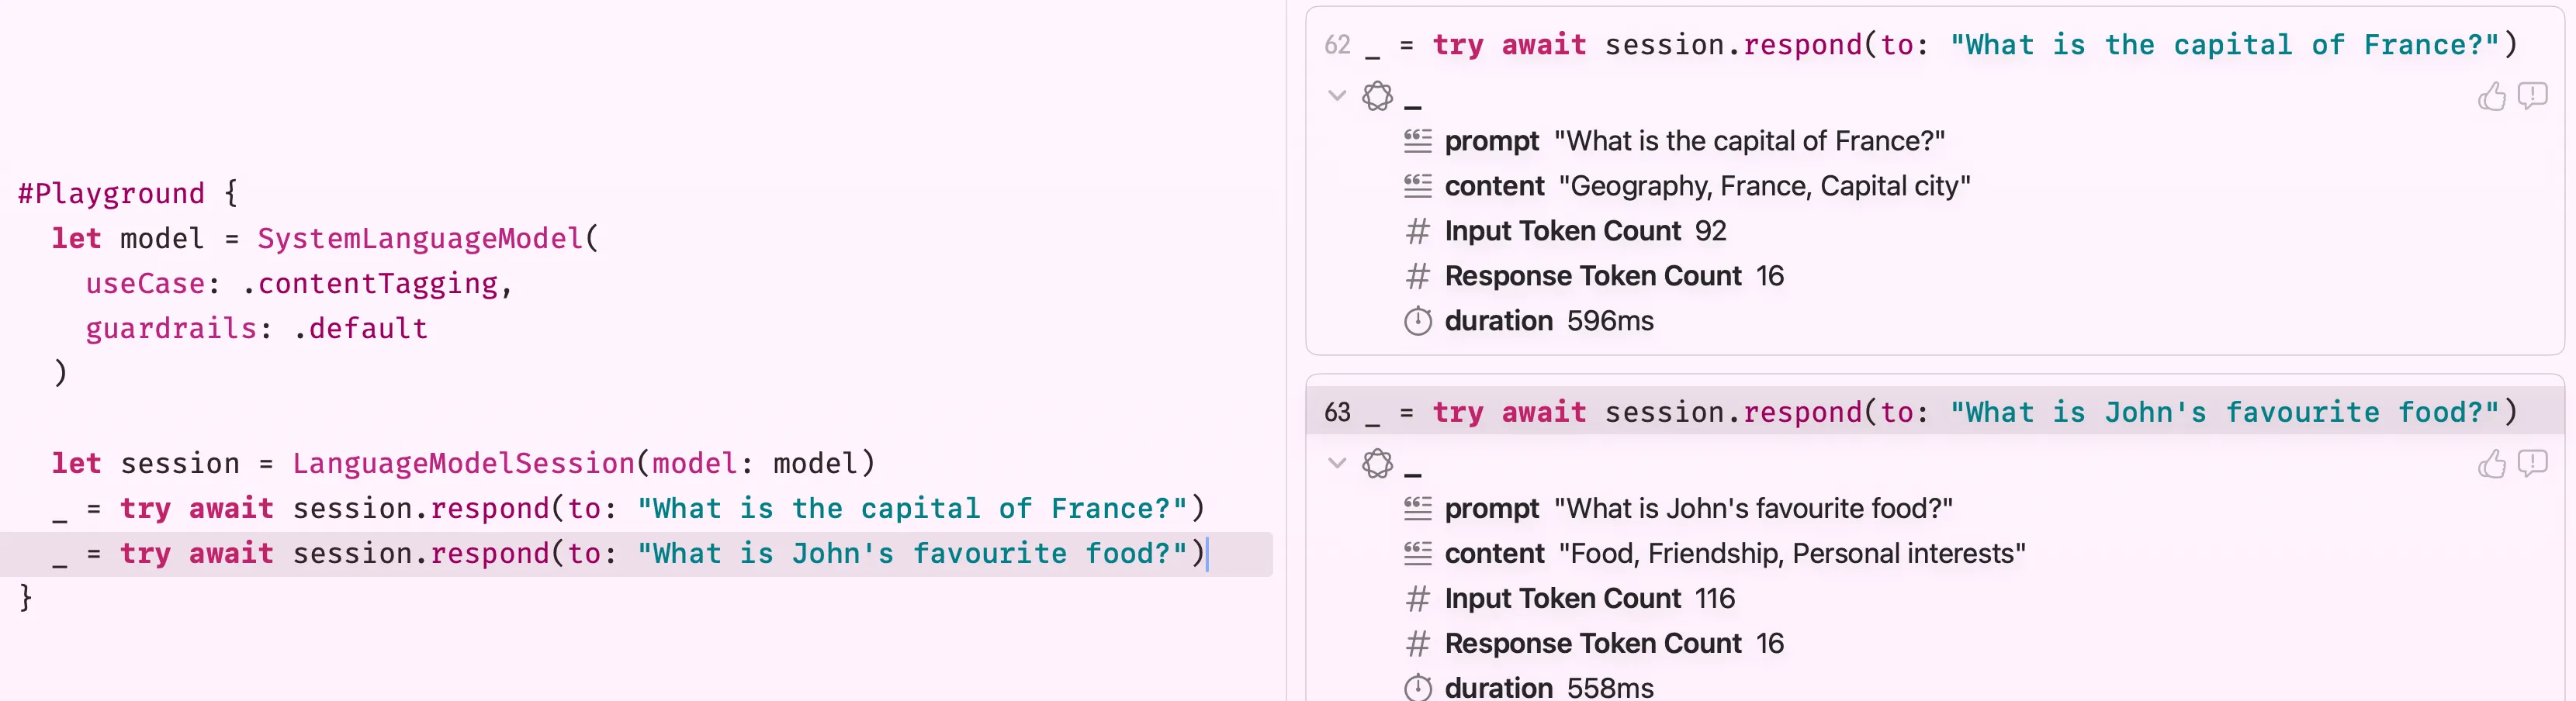
As you can see, I ask two questions and it can tag accordingly to both of them.
Note: Before using any specialised model, always check its availability separately, it may not be ready even if the default model is:
let taggingModel = SystemLanguageModel(useCase: .contentTagging)

if case .available = taggingModel.availability {
    let session = LanguageModelSession(model: taggingModel)
    // ...
}
If you can only remember one thing from this section, let it be the following: reach for the default model when the task is open-ended, and reach for a specialised adapter when you know exactly what the model will be doing. The specialised ones are snappier and waste less of the device’s budget on capabilities you don’t need.
Vision Capability
New in iOS 26, the Foundation Models framework gained multimodal prompting, a fancy way of saying you can now hand the model an image alongside your text and it will reason about both together. This unlocks a whole category of features that were previously impossible with pure text.
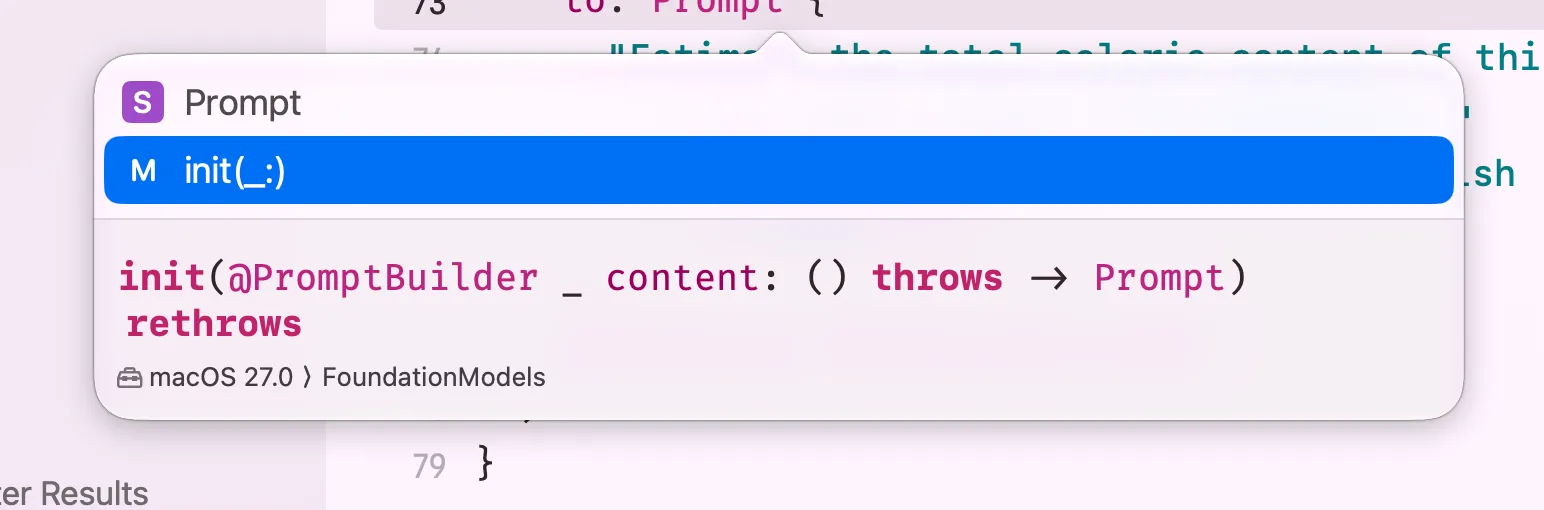
You attach images by passing them into a Prompt. The Prompt type has a @PromptBuilder closure, that allows you to build prompt in SwiftUI-like DSL.
The framework accepts a wide range of types so you can plug in whatever your app already works with, UIImage, NSImage, CGImage, CIImage, a CVPixelBuffer (what AVFoundation hands you from the live camera), or a file URL pointing to an image on disk. So, technically, you can use the whole video feed as an input and generate response in real life.
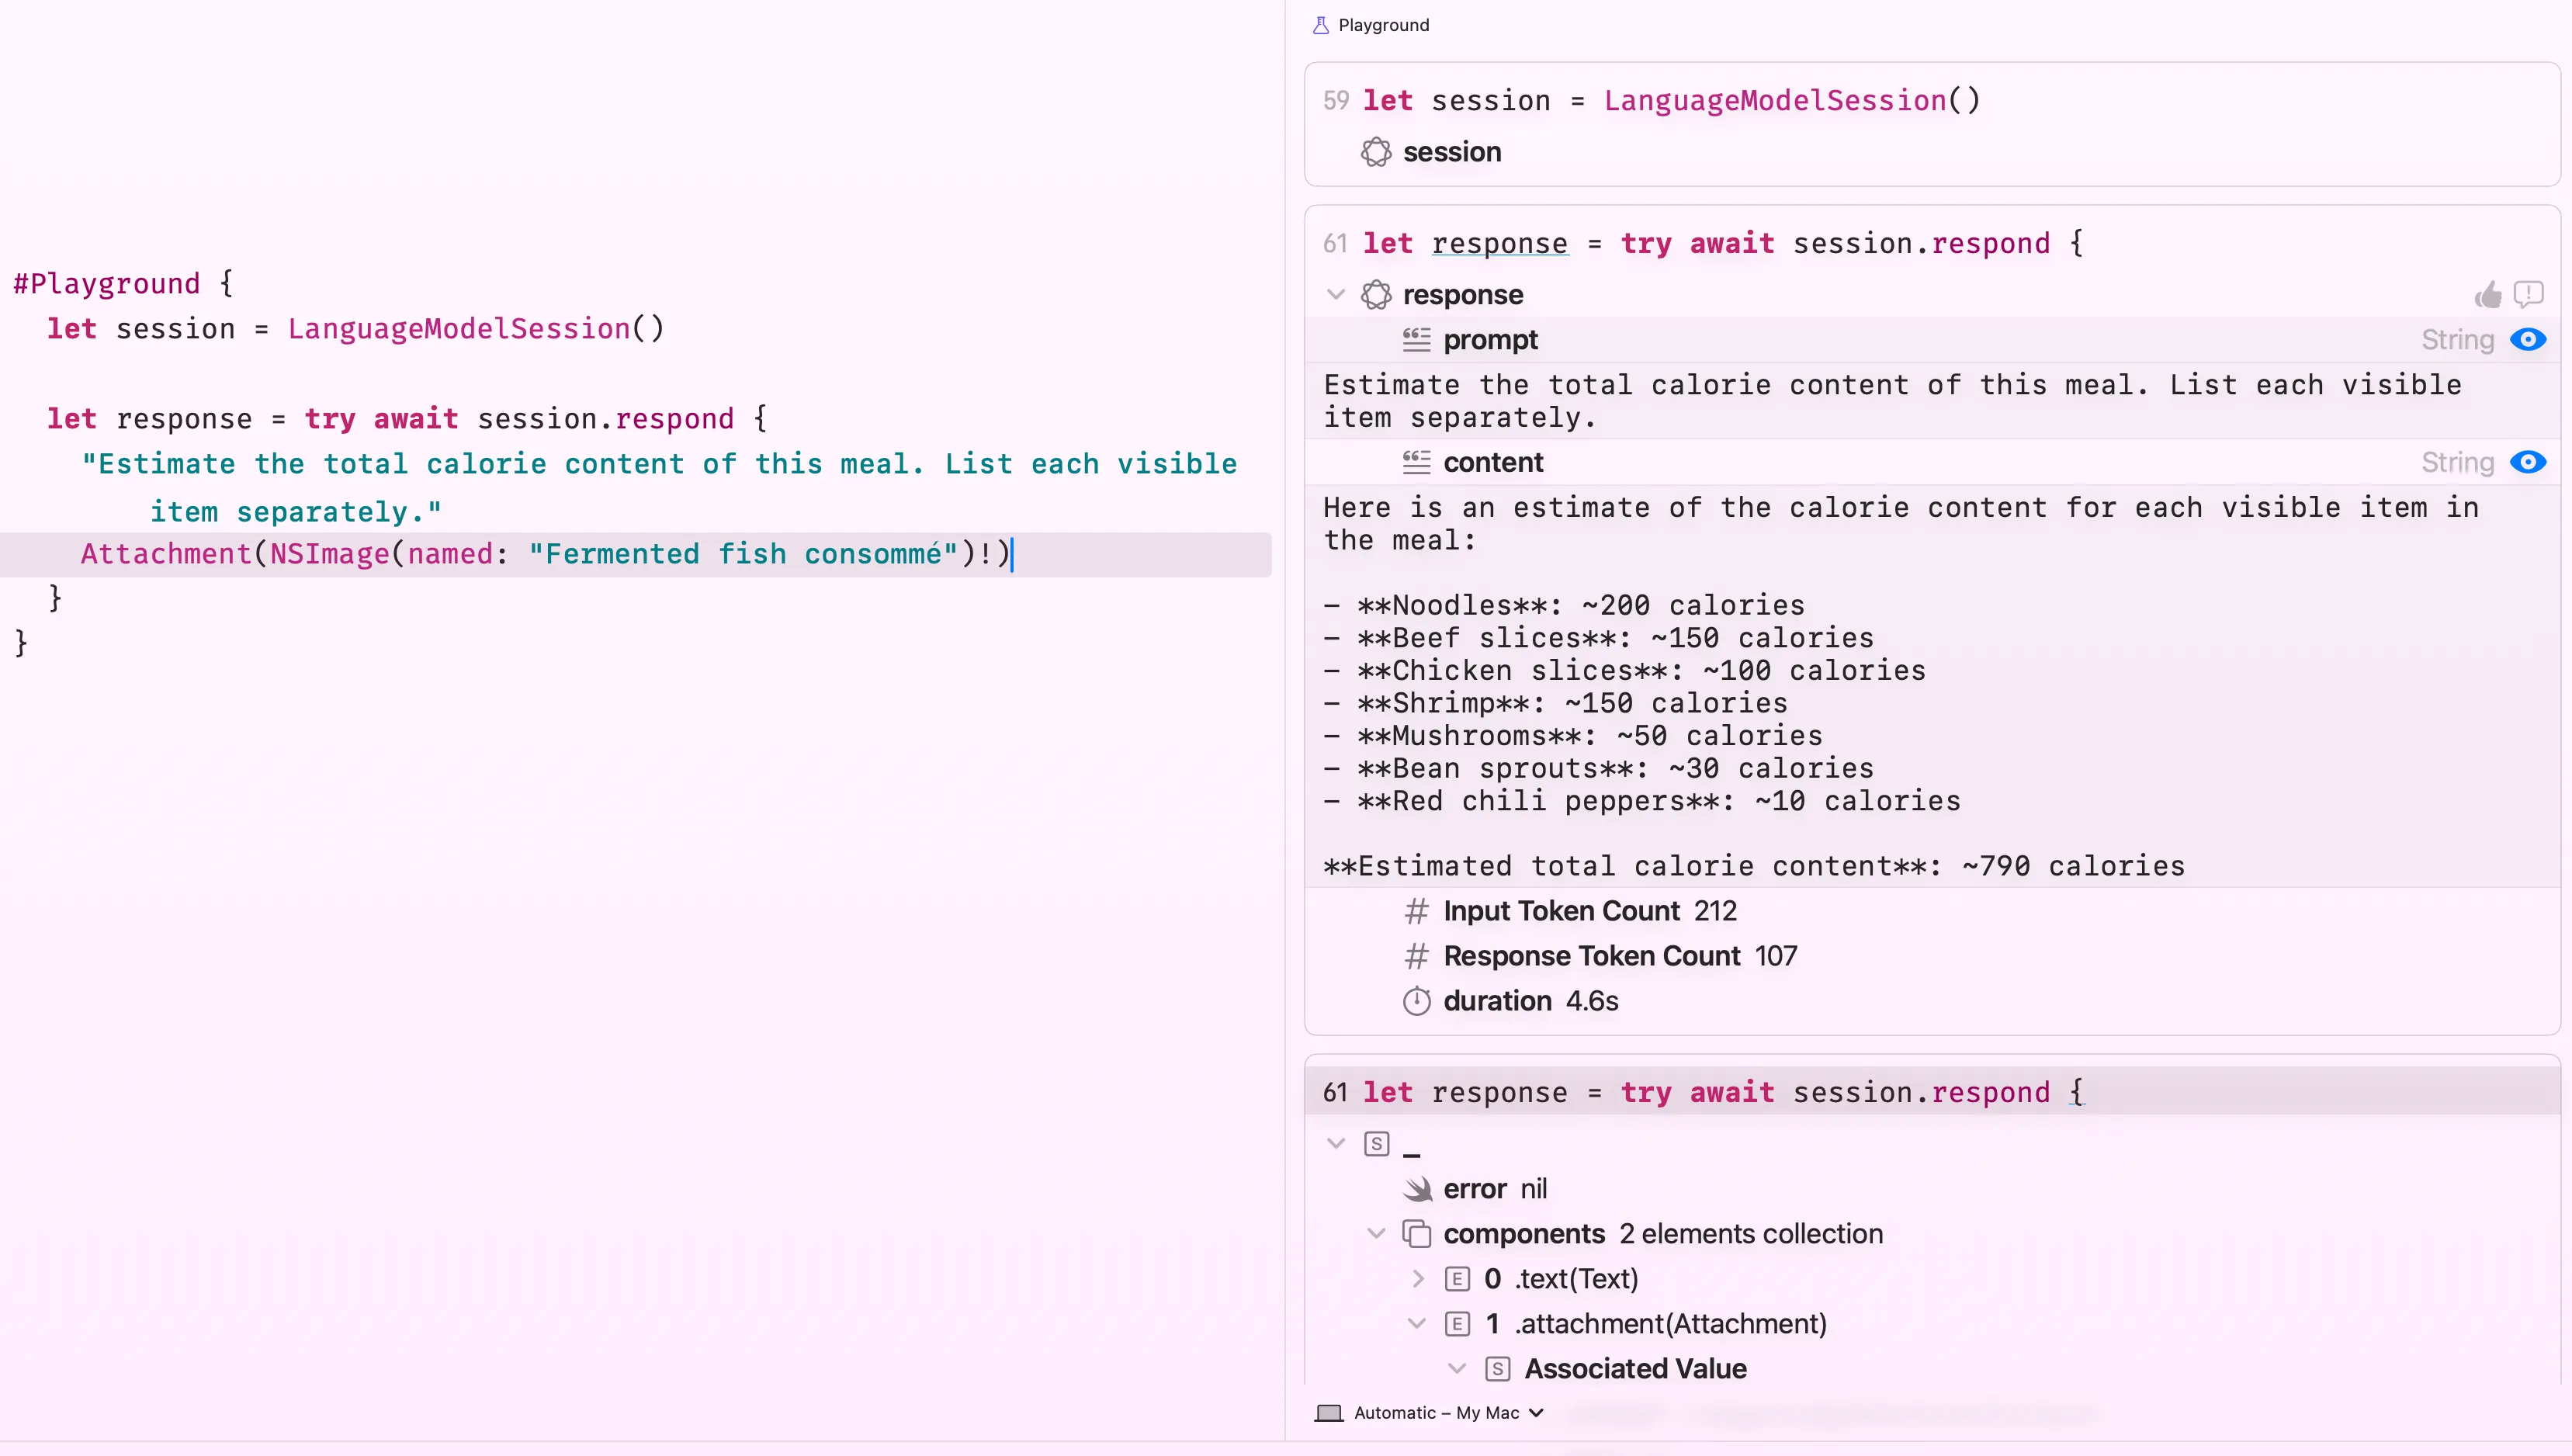
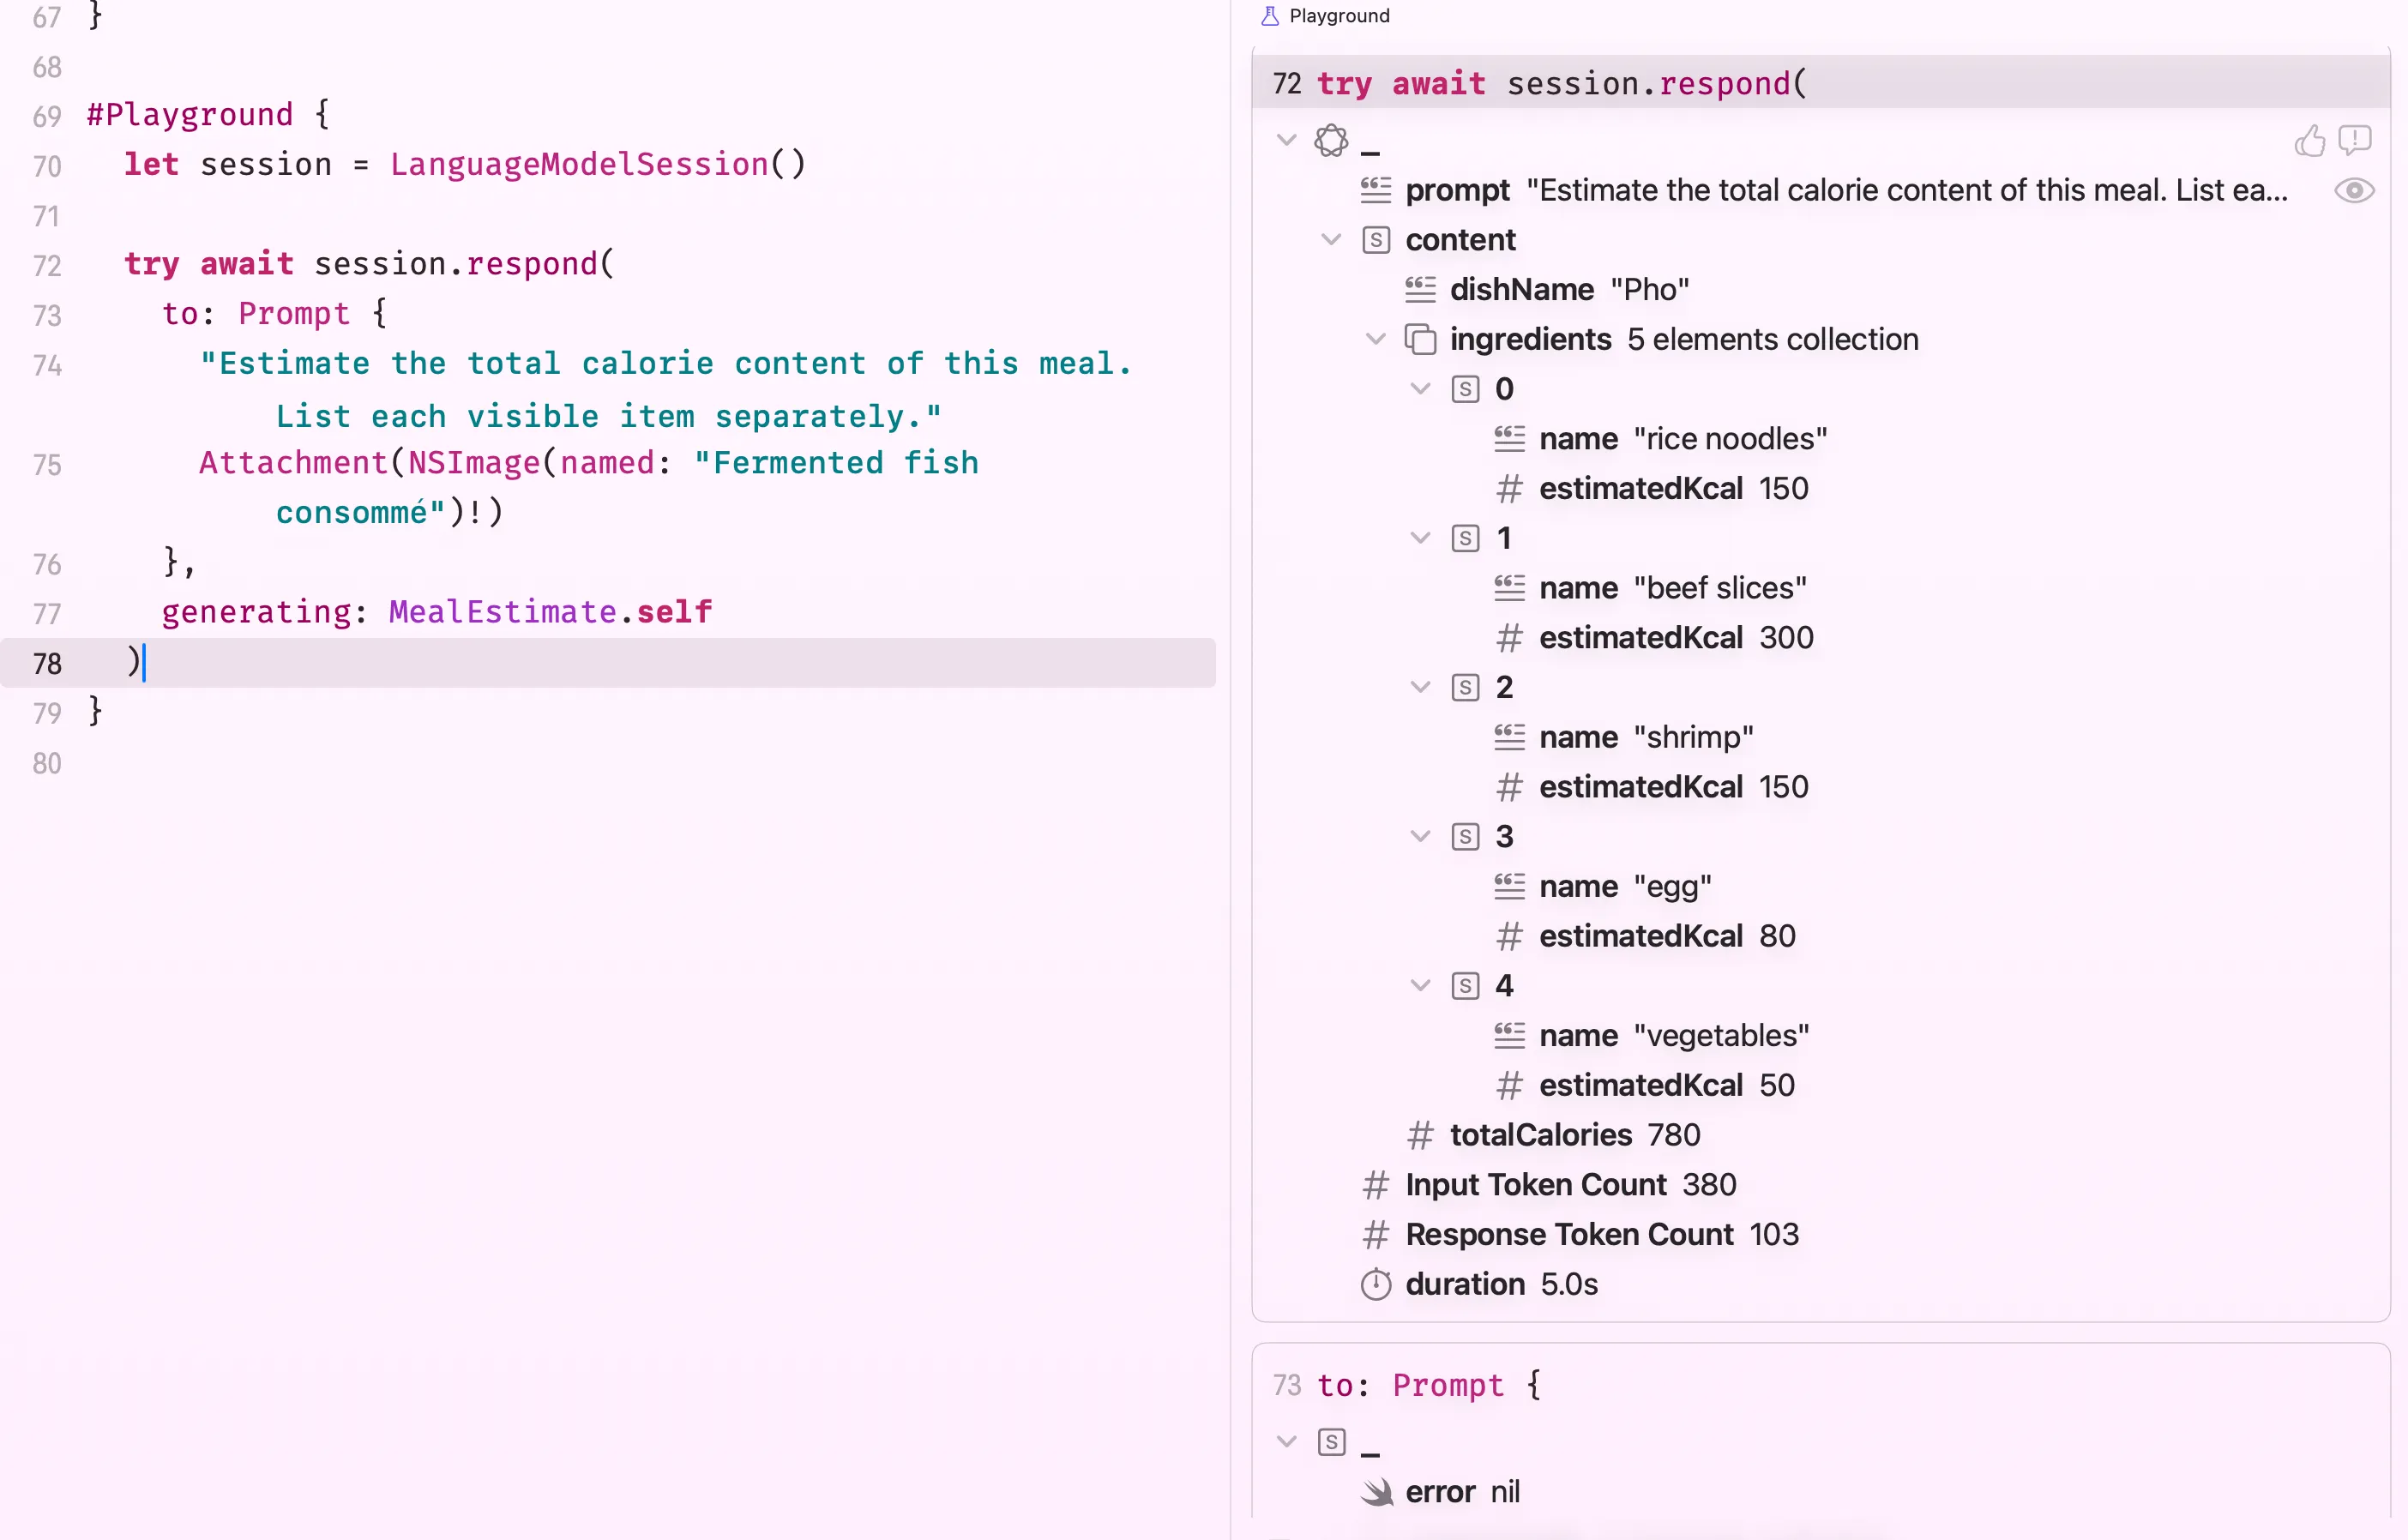
The image comes straight from the asset catalog, but, in real life, you may ask user to capture/upload an image. Just drop it in and ask. The model sees what’s in the bowl and reasons about it. Here’s the image I use btw.

You can also pair vision with guided output to get a typed Swift struct back instead of a raw string
@Generable
struct MealEstimate {
    @Guide(description: "Name of the dish")
    var dishName: String

    @Guide(description: "Visible ingredients with individual calorie estimates")
    var ingredients: [IngredientEstimate]

    @Guide(description: "Total estimated calories for the full meal")
    var totalCalories: Int

    @Generable
    struct IngredientEstimate {
        var name: String
        var estimatedKcal: Int
    }
}
And here’s how it responds:
Take note that larger images consume more tokens from the model’s context budget. If you’re working with full-resolution camera output or photo library picks, consider downscaling to around 512–1024px before attaching, that’s usually enough for the model to reason about food, objects, or scenes without unnecessarily burning through the context window.
Vision prompting works with individual images, not live video streams. If you want to analyse live camera output, capture frames from AVFoundation as
CVPixelBufferand pass them one at a time. Think of it as “sample a frame, ask a question” rather than feeding a continuous stream.
Providing Custom Models
One of the biggest WWDC26 announcements for Foundation Models was that Apple opened up the model layer. Instead of being locked to either the on-device model or PCC, you can now drop in any language model — from any provider — and the rest of your Foundation Models code stays exactly the same. I may also write a separate about this topic, revolving around brand new CoreAI framework and what not.
Regardless, the abstraction behind this is the LanguageModel protocol. Both SystemLanguageModel and PrivateCloudComputeLanguageModel already conform to it. Now third-party providers can too. I’ve seen announcements from Gemini and Claude supporting foundation models during this week.
Using Claude or Gemini via Swift Package
Anthropic and Google both publish official Swift packages that wire their models into the LanguageModel protocol. To use Claude or Gemini in a Foundation Models session, you add their package in Xcode, import it, and pass the model when creating the session. Everything else, instructions, tools, structured output, streaming, stays identical. For more information, check out Claude’s official documentation.
import FoundationModels
import ClaudeForFoundationModels

let model = ClaudeLanguageModel(
  name: .sonnet4_6,
  auth: .apiKey(ProcessInfo.processInfo.environment["ANTHROPIC_API_KEY"] ?? "")
)

let session = LanguageModelSession(model: model)
let response = try await session.respond(to: "Plan a 4-day trip to Buenos Aires.")
print(response.content)
The same works for Gemini, I have taken the example code from their blog post:
import FoundationModels
import FirebaseCore
import FirebaseAILogic

// Call this once at app startup (AppDelegate or @main App struct)
FirebaseApp.configure()

// Initialize Gemini via Firebase AI Logic
let ai = FirebaseAI.firebaseAI(backend: .googleAI())
let model = ai.geminiLanguageModel(name: "gemini-3.5-flash")

let session = LanguageModelSession(
    model: model,
    instructions: "You are a nutrition assistant specialising in Vietnamese cuisine."
)

let response = try await session.respond(to: "What are the health benefits of bún bò Huế?")
print(response.content)
Your tools, @Generable structs, streaming calls, none of that changes when you swap the model. That’s the whole point of the abstraction.
Bringing Your Own Model
If you want to wire in a model that doesn’t have an official package yet, a locally hosted model, a fine-tuned model you ship inside your app, or any provider that hasn’t published a Swift package, you can implement the LanguageModel protocol yourself.
It’s a two-piece contract. LanguageModel declares the model’s capabilities and configuration. LanguageModelExecutor does the actual work, it receives the session’s transcript, applies generation options, and streams tokens back.
Once your conformance is in place, it plugs straight into LanguageModelSession
let session = LanguageModelSession(model: MyCustomModel())
// From here, identical to using SystemLanguageModel or PCC
let response = try await session.respond(to: "...")
Building a full executor is non-trivial, you’re responsible for translating Transcript entries into your model’s native prompt format, respecting ContextOptions, and streaming partial responses correctly. But the payoff is that the rest of your app code never needs to know which model it’s talking to.
With that said, Apple also open-source CoreAI models, you can see it for yourself how they implement here.
Private Cloud Compute Model (PCC)
The on-device model is fast, free, and private, but it’s also small. A 3-billion-parameter model has a limited context window and won’t win any awards for complex multi-step reasoning. For the kinds of tasks that need more horsepower, long documents, deep analysis, nuanced reasoning, Apple introduced Private Cloud Compute at WWDC26.
The idea is actually not new, instead of running on the device’s Neural Engine, the request goes to Apple’s own servers. But you can imagine, Apple designed PCC with a strict privacy guarantee, requests are processed in an isolated environment, not logged, not accessible to Apple employees, and cryptographically attestable etc. Your user’s data goes to Apple’s servers, but nobody at Apple can actually see it, or at least, that’s what they said.
From an API perspective, it looks almost identical to the on-device model. You swap SystemLanguageModel.default for PrivateCloudComputeLanguageModel.default, and everything else like sessions, instructions, tools, structured output just work exactly the same
import FoundationModels

// Swap in the PCC model — everything else stays the same
let session = LanguageModelSession(model: PrivateCloudComputeLanguageModel.default)

let response = try await session.respond(
    to: "Analyse this weekly meal plan and suggest nutritional improvements based on WHO guidelines."
)
No API key. No account. No configuration. It just works, as long as the device has an internet connection. For more information, check out the official documentation.
Reasoning Levels
The PCC model has a 32K context window and supports reasoning levels, a way to tell the model how deeply to think before responding. You set this via contextOptions on the respond call:
let response = try await session.respond(
    to: "Compare the metabolic impact of these five meal plans and rank them for fat loss.",
    options: GenerationOptions(
        contextOptions: ContextOptions(reasoningLevel: .deep)
    )
)
The three levels are:
.light— fast response, minimal reasoning. Good for classification, tagging, or short answers..moderate— balanced. A sensible default for most tasks..deep— the model thinks longer before responding, producing noticeably better results on complex analysis, multi-step problems, or anything that benefits from careful consideration. Costs more compute time.
The great thing is you don’t have to choose once and stick with it. Because both models conform to the same LanguageModel protocol, you can switch between them per-feature, or even let the user choose, without rewriting any of your session logic.
Checking Availability
PCC requires internet, so always check before using it:
let pccModel = PrivateCloudComputeLanguageModel.default

switch pccModel.availability {
case .available:
    let session = LanguageModelSession(model: pccModel)
    // proceed
case let .unavailable(reason):
    // fall back to on-device or show a message
    print("PCC unavailable: \(reason)")
}
Giving Context to Your Session
Here’s where things get genuinely interesting. When you create a LanguageModelSession, you can pass it an instruction, a behind-the-scenes briefing that tells the model what its role is, how it should behave, and what constraints it must follow.
Think of it as a system prompt. The instruction comes from you, the developer, not the user. It stays active for the entire session and is always evaluated before any user message. Every prompt the user sends gets filtered through this context first.
Here’s a real example. I’ve been taking gym workouts seriously lately, so I built a session that acts as a nutritionist for my needs:
let instruction = """
You are an expert nutritionist specializing in metabolism and weight loss. Create meal plans based on user requirements.

CRITICAL RULES:
1. **Time Limit:** Prep and cook time MUST be 15 minutes or less.
2. **Location (Vietnam):** Ingredients MUST be cheap and easily found in standard Vietnamese wet markets (chợ) or local supermarkets (WinMart, Bach Hoa Xanh). Use local staples: lean pork, chicken breast, eggs, tofu, fish, rau muống, cucumber, and rice/rice noodles.
3. **Metabolic Focus:** High protein, low sugar, no deep-frying.

OUTPUT FORMAT:
**[Meal Name]** (Include Vietnamese translation)
- **Time:** [X] mins
- **Ingredients:** [List with measurements]
- **Steps:** [Short bullet points]
- **Metabolic Benefit:** [1-sentence explanation]

Tone: Direct, practical, no conversational fluff.
"""
This instruction shapes every single response the model gives for the lifetime of that session. The user just asks what they want, no need to repeat context or remember magic phrases. Your instruction handles the persona, the constraints, and the output format. It’s your secret sauce, and the user never sees it.
One important thing worth calling out is that the instruction should always be a static, hardcoded string defined by you, never something the user can edit or influence. If you build the instruction from user input (say, from a text field), you’re opening the door to prompt injection, where a malicious user crafts an input that overrides your rules and makes the model behave in ways you didn’t intend. Keep the instruction locked down on your side of the fence.
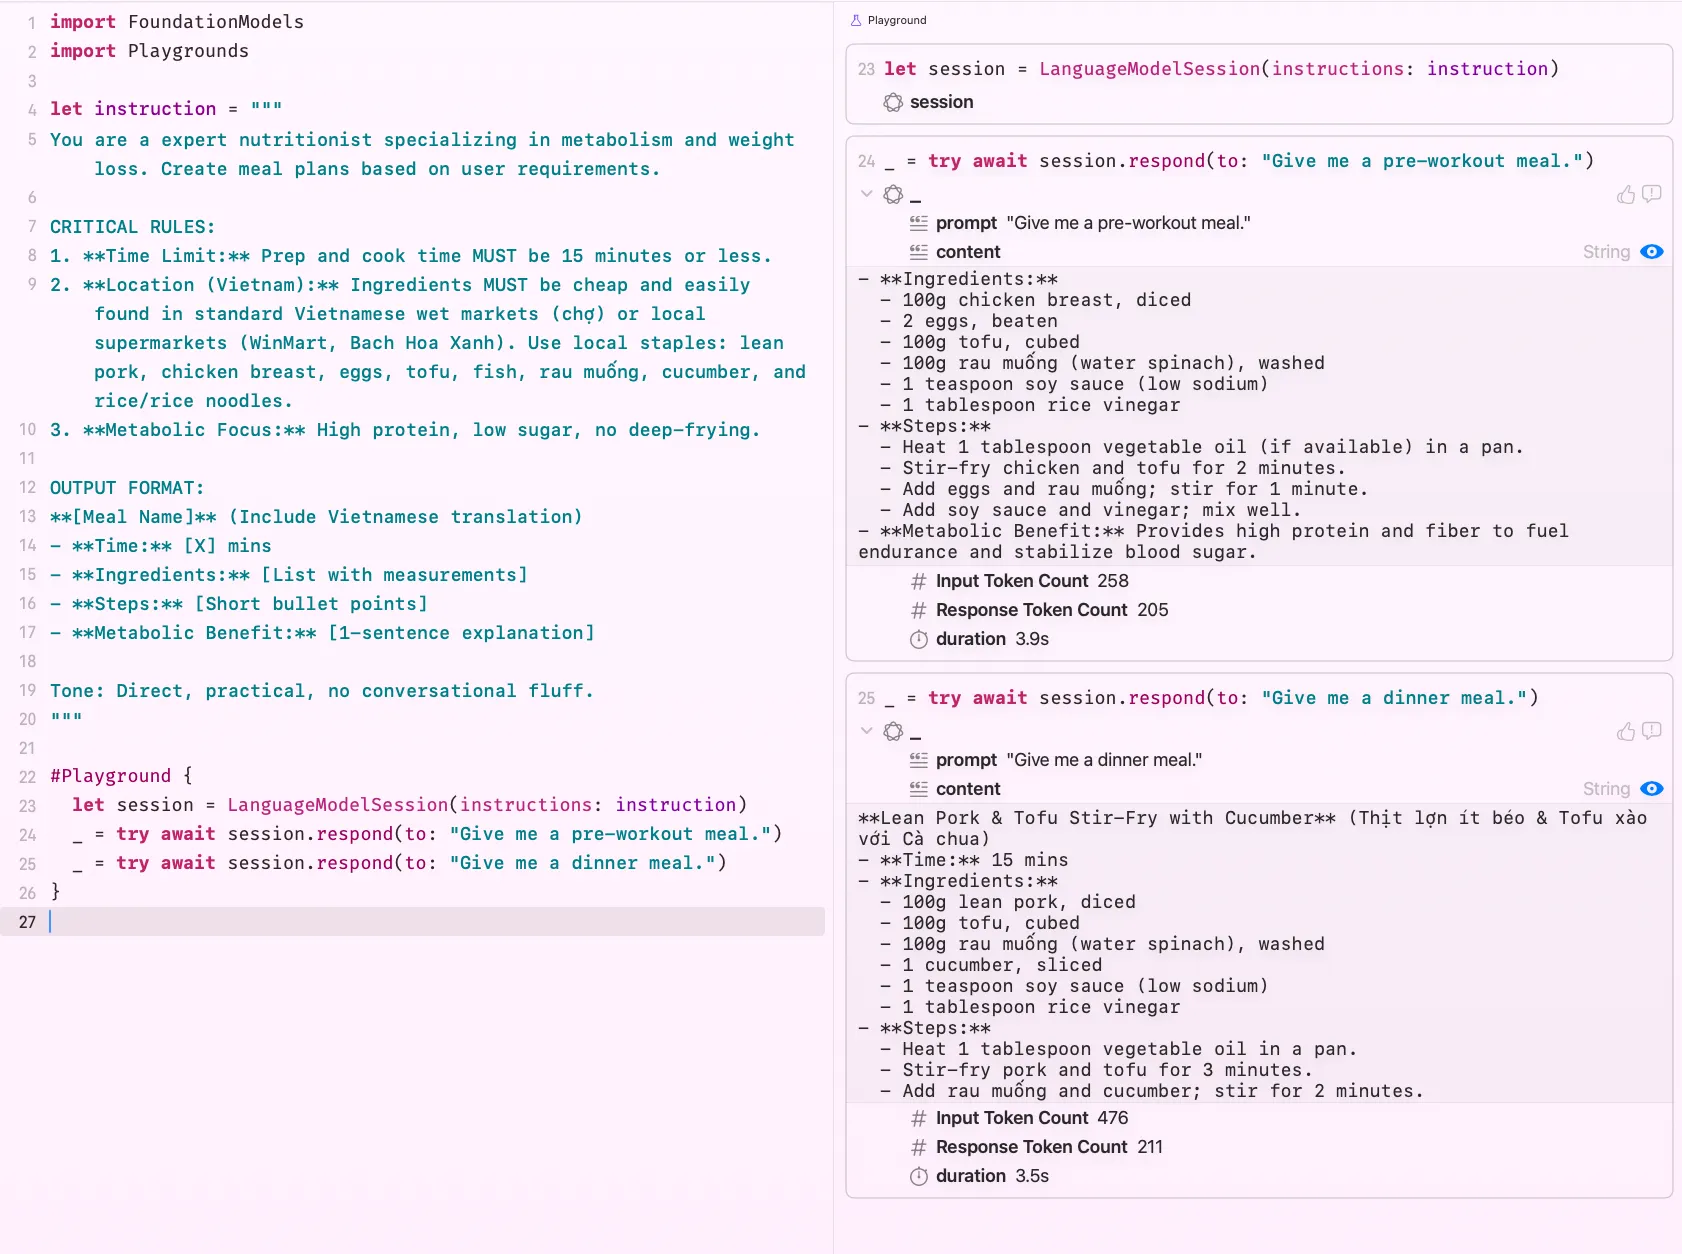
Look at that, properly structured, genuinely useful output, no hand-holding required from the user’s side. That’s the whole point. Your instruction does the heavy lifting quietly in the background, and the user just gets a feature that feels delightful.
Structured Output Generation
Instructing the model to format its text output is useful, but there’s a level up from that. What if the model handed you back a real, typed Swift struct instead of a raw string? No parsing, no Codable gymnastics, no hoping the model remembered your format instructions. Just a proper Swift value, ready to use.
That’s what @Generable is for.
You annotate your struct with @Generable, and each property with @Guide, a hint that tells the model what that field should contain. Think of @Guide as a per-field instruction, like a tiny label on each dial
@Generable
struct Meal {
    @Guide(description: "Meal name, including Vietnamese translation")
    var name: String

    @Guide(description: "Total prep and cook time in minutes")
    var time: Double

    @Guide(description: "List of ingredients with measurements")
    var ingredients: [Ingredient]

    @Guide(description: "Short step-by-step cooking instructions")
    var steps: [String]

    @Guide(description: "One sentence explaining the metabolic benefit")
    var benefit: String?

    @Generable
    struct Ingredient {
        @Guide(description: "Ingredient name")
        var name: String

        @Guide(description: "Measurement, e.g. 100g, 2 eggs, 1 cup")
        var measurement: String
    }
}
Once your struct is @Generable, you pass the type directly to respond(to:generating:) and the framework handles the rest:
let response = try await session.respond(
    to: "Give me a pre-workout meal",
    generating: Meal.self
)
That’s it. No string parsing. The model reads your struct definition and @Guide hints, and returns a fully populated Meal value.
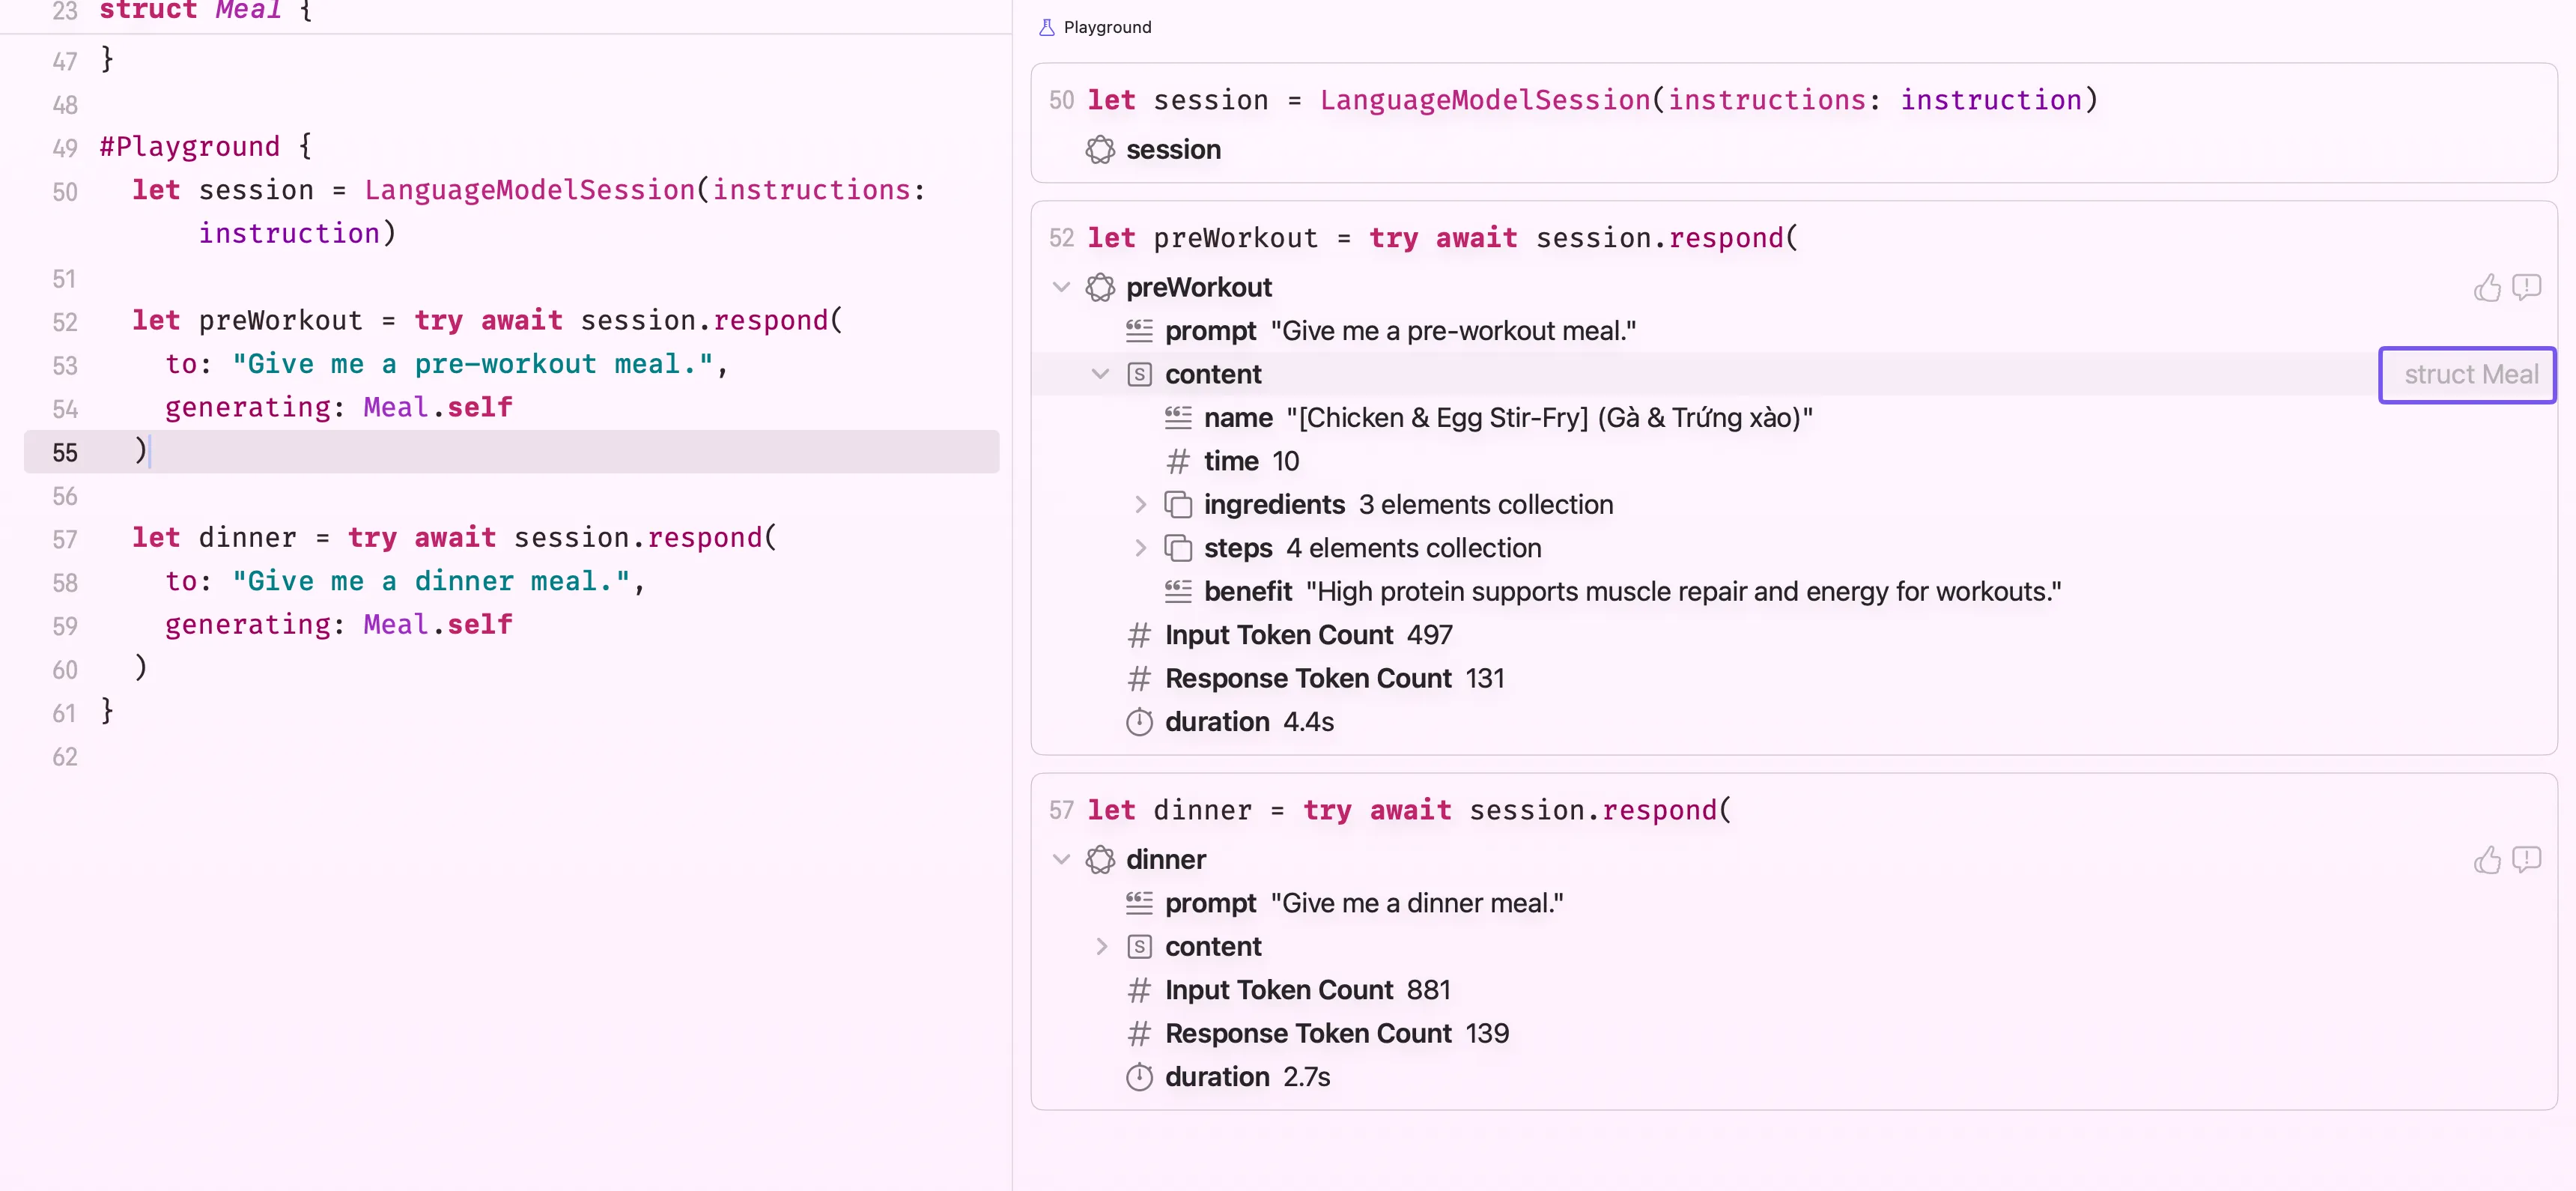
You can see in the screenshot above that response.content is of type Meal, not String. This is genuinely one of the most useful things about Foundation Models. Your downstream app code stays clean and type-safe; the AI layer absorbs all the messiness of free-form text generation before it ever reaches you.
Streaming Responses
So far we’ve been calling respond(to:) and waiting for the full answer to come back before doing anything with it. That works fine for short outputs, but for longer responses it means the user stares at a blank screen for a second or two before anything appears. Not a great experience.
The fix is streaming and if you’ve tried to call ChatGPT models from swift, you’ve already seen what it looks like. Instead of waiting for the complete response, the model sends tokens as it generates them, word by word, and your UI updates live.
In raw API terms (like OpenAI’s), that means receiving a stream of deltas, tiny text fragments you accumulate yourself:
"Give" -> "Give me" -> "Give me a" -> "Give me a meal..."Doing this yourself sounds fine until you also need to handle partial JSON, incomplete sentences, and UI updates at the right granularity. It gets messy fast.
Foundation Models handles all of that for you. Call streamResponse(to:) instead of respond(to:), and you get back an AsyncSequence where each element already contains the accumulated text so far, not a raw delta. No manual concatenation required!
let stream = session.streamResponse(to: "Give me a quick pre-workout meal plan")

for try await partial in stream {
    updateUI(with: partial.text)
}
In SwiftUI, this wires naturally into @State
@State private var output = ""

Button("Generate") {
    Task {
        let stream = session.streamResponse(to: userPrompt)
        for try await partial in stream {
            output = partial.text
        }
    }
}

Text(output)
The text appears word by word as the model generates it. Users see the response building live rather than waiting for a blank screen to suddenly fill up. That alone makes a huge difference to how the feature feels.
Streaming also works with @Generable types. As the model generates tokens, Foundation Models progressively populates your struct, so you can reflect partial values in the UI before the full response is ready
let stream = session.streamResponse(
    to: "Give me a quick high-protein pre-workout meal",
    generating: Meal.self
)

for try await partial in stream {
    // partial.content is a partially populated Meal
    // fields fill in as the model generates them
    if let name = partial.content.name {
        mealNameLabel.text = name
    }
}
If you can take anything from this section, use
respond(to:)for short outputs where latency won’t be noticeable. UsestreamResponse(to:)for anything longer, meal plans, summaries, lists — where showing progress beats showing nothing.
Tools
One of the oldest complaints about LLMs is that they’re stuck in the past. The model knows what it was trained on, and nothing else. No live data, no idea what happened yesterday, no way to reach into your app’s database or call an external API. It’s a very smart, very isolated brain.
That changes with tools. A tool is a Swift function you write that the model is allowed to call during generation. When the model needs real-world information it doesn’t have, it calls your tool, gets the result, and folds it into its response. You can fetch from a REST API, query a local database, read from the user’s file system, basically anything you can do in code. The model gets to act, not just talk.
Foundation Models has supported this from day one. Let’s see how it works.
Native(System) Tools
The first kind of tools you’ll want to know about are the ones Apple ships for you. At WWDC26, they introduced a set of built-in native tools that you can drop straight into a session, no implementation required. They’re backed by Apple’s own frameworks (Vision, Spotlight) and run entirely on-device.
You use them by passing them into tools: when creating the session, and the model decides when to call them based on the prompt.
BarcodeReaderTool — backed by the Vision framework. When the model needs to read a barcode or QR code from an image, it calls this tool and gets the decoded content back. For our nutrition app, this is immediately useful: instead of typing an ingredient name, the user can scan a food product’s barcode and ask “what are the calories in this?”
let session = LanguageModelSession(
    tools: [BarcodeReaderTool()],
    instructions: "Help users understand the nutritional content of food products."
)

// User scans a barcode — pass the image and ask
let response = try await session.respond(
    to: Prompt("What are the calories and main ingredients in this product?", images: [productImage])
)
The model reads the barcode from the image, extracts the product code, and uses that to reason about the product, all without you writing a single line of Vision framework code.
OCRTool — also Vision-backed. Extracts text from images and makes it available for the model to reason over. Useful when a user photographs a menu, a nutrition label, a receipt, or any document with text in it.
let session = LanguageModelSession(
    tools: [OCRTool()],
    instructions: "Extract and summarise nutritional information from food labels."
)

let response = try await session.respond(
    to: Prompt("Summarise the nutrition facts from this label.", images: [labelPhoto])
)
// Model uses OCRTool to extract the text from the photo, then summarises it
SpotlightSearchTool — this one is particularly exciting. As part of CoreSpotlight framework, it gives the model access to the user’s Spotlight index, their files, notes, messages, emails, and other on-device content, to answer questions grounded in the user’s personal data.
This is fully local RAG (Retrieval-Augmented Generation). RAG is the technique of fetching relevant documents at query time and feeding them to the model alongside the prompt, so the model’s answer is grounded in up-to-date information rather than just training data. Normally implementing RAG requires a vector database, an embedding pipeline, and a bunch of infrastructure. With SpotlightSearchTool, all of that is already there, it’s just the user’s own device index.
let session = LanguageModelSession(
    tools: [SpotlightSearchTool()],
    instructions: "Answer questions using the user's personal files and notes where relevant."
)

let response = try await session.respond(
    to: "What was that recipe I saved last week?"
)
// Model searches Spotlight for recent saved recipes and answers from the actual file
If you watched the WWDC26 keynote, you saw a perfect live demo of exactly this. The presenter asked Siri: “What is everyone bringing to the potluck?” — and Siri instantly surfaced answers from multiple active Messages threads, cross-referenced them, and delivered a clean summary. No app was opened. No thread was manually searched. Siri just knew.
That’s SpotlightSearchTool in action. The model issued searches against the Spotlight index, pulled relevant message excerpts from different conversations, synthesised them together, and answered the question as if it had read every thread itself. The whole thing happened on-device, privately, in seconds.
The same capability is available to you. Any app can now build a feature that actually knows what’s on the user’s device, their notes, their saved articles, their messages, their documents, and answers questions grounded in that personal context, without any of it ever leaving the device.
All three tools run entirely on-device, with no network requests. The user’s data stays local.
Those are the tools Apple gives you out of the box. If you feel like you need more, worry not. Rudrank Riyam has a fantastic FoundationModelsKit repository, a collection of custom tools and utilities to help working with the language model better. You should definitely check this one out. But what if you need the model to talk to your own backend, query your database, or call a third-party API? That’s where custom tools come in, and they’re just as straightforward to wire up.
How to Create a Custom Tool
Sticking with our nutrition app, after the model generates a meal plan, what if it could automatically look up the calorie count for each ingredient? That’s a perfect job for a tool.
You define a tool by conforming to the Tool protocol. The two most important pieces are a description (this is what the model reads to decide when to call your tool; write it clearly) and a @Generable Parameters struct that defines what arguments the model will pass.
For the data source, we’ll use the Open Food Facts API, completely free, no API key required. It has a search endpoint that returns nutrition data including calories per 100g for almost any ingredient you can think of.
import FoundationModels

struct CalorieLookupTool: Tool {
    let name = "lookUpCalories"
    let description = "Looks up the approximate calorie count for a given ingredient and measurement using Open Food Facts. Call this after generating a meal plan."

    @Generable
    struct Parameters {
        @Guide(description: "The ingredient name, e.g. 'chicken breast'")
        var ingredient: String

        @Guide(description: "The amount, e.g. '150g' or '2 eggs'")
        var measurement: String
    }

    func call(arguments: Parameters) async throws -> String {
        let query = arguments.ingredient
            .addingPercentEncoding(withAllowedCharacters: .urlQueryAllowed) ?? arguments.ingredient
        let url = URL(string: "https://world.openfoodfacts.org/cgi/search.pl?action=process&search_terms=\(query)&json=true&fields=product_name,nutriments&page_size=1")!

        let (data, _) = try await URLSession.shared.data(from: url)
        let result = try JSONDecoder().decode(OpenFoodFactsResponse.self, from: data)

        guard let kcalPer100g = result.products.first?.nutriments.energyKcal100g else {
            return "Could not find nutrition data for \(arguments.ingredient)."
        }

        if let grams = extractGrams(from: arguments.measurement) {
            let total = Int((Double(grams) / 100.0) * kcalPer100g)
            return "\(arguments.measurement) of \(arguments.ingredient) is approximately \(total) kcal."
        }

        return "\(arguments.ingredient) has approximately \(Int(kcalPer100g)) kcal per 100g."
    }

    private func extractGrams(from measurement: String) -> Int? {
        if let match = measurement.firstMatch(of: /(\d+)\s*g/) {
            return Int(match.1)
        }
        return nil
    }
}

private struct OpenFoodFactsResponse: Decodable {
    let products: [Product]

    struct Product: Decodable {
        let nutriments: Nutriments

        struct Nutriments: Decodable {
            let energyKcal100g: Double?

            enum CodingKeys: String, CodingKey {
                case energyKcal100g = "energy-kcal_100g"
            }
        }
    }
}
A few things worth noting here. nothing to do with Foundation Models, just response decoding… extractGrams uses Swift’s regex literal syntax to pull a gram value out of the measurement string, so “150g” gives you 150, and the tool calculates the actual calories for that amount. If the measurement isn’t in grams (like “2 eggs”), it gracefully falls back to reporting per 100g instead. The CodingKeys mapping on Nutriments handles the hyphenated "energy-kcal_100g" key the API returns, which Swift’s property naming can’t express directly.
The call(arguments:) method is where your real logic lives. Whatever you return as ToolOutput goes straight back to the model, it reads the result and continues generating from there.
By default, ToolOutput wraps a plain string — fine for simple answers. But if you want to hand the model something more precise, you can return a @Generable struct instead, the same pattern you used in Guided Output Generation. Just mark your output type and pass it into ToolOutput:
@Generable
struct NutritionInfo {
    @Guide(description: "Calories in kcal")
    var calories: Int

    @Guide(description: "Protein in grams")
    var protein: Double

    @Guide(description: "Carbohydrates in grams")
    var carbs: Double
}

// Inside CalorieLookupTool
func call(arguments: Parameters) async throws -> ToolOutput {
    // ... fetch from Open Food Facts ...
    let info = NutritionInfo(calories: 248, protein: 31.0, carbs: 0.0)
    return ToolOutput(info)
}
The model receives typed, structured data rather than a raw sentence. This matters when the result feeds into further reasoning — the model can work with calories: 248 much more reliably than it can parse “approximately 248 kcal” out of a string.
To give the session access to your tool, pass it in at initialisation:
let session = LanguageModelSession(
    tools: [CalorieLookupTool()]
)

let response = try await session.respond(
    to: "Generate a quick pre-workout meal and tell me the total calories."
)
That’s the whole loop. The model generates the meal, recognises it needs calorie data, calls CalorieLookupTool once per ingredient, reads the results, and wraps it all into a single coherent response, without you having to orchestrate any of that manually.

For more information, check out Apple official documentation here.
Wait, What Can a Tool Actually Access?
Good question, and the answer is reassuringly simple: a tool runs inside your app’s process, with exactly the same permissions your app already has. There’s no special AI sandbox around it. The call method is just a Swift function, it runs as part of your app, not in some isolated bubble.
In practice, that means a tool can hit a REST API, fetch a remote database, talk to your own backend. Subject to the same App Transport Security rules and Info.plist entitlements your app uses. It can also read and write to the app sandbox, such as query Core Data, read from UserDefaults, write files to the app’s documents directory. It can also use any framework your app imports such as HealthKit, CoreLocation, EventKit, and your own business logic layer. If your app has the entitlement and the user has granted permission, the tool can use it.
What it cannot do is reach directly into other apps. Standard iOS and macOS sandboxing still applies, a tool won’t suddenly let the model read another app’s data or write to places your app normally can’t. The model inherits your app’s reach, nothing more.
Tools are synchronous from the model’s perspective. The model pauses generation, waits for your
callmethod to return, then continues. For fast lookups this is fine. For slow network calls, consider caching or giving the user a visual indicator that something is happening behind the scenes.
This is actually a healthy security property. The model can’t do anything you haven’t already authorised your app to do. If you’re concerned about a tool making unintended network calls or accessing sensitive user data, the guardrail is the same as it always was, your app’s entitlements and permission prompts.
Making most out of Tools
If you use Claude Code, a tool is like a plugin. You hand Foundation Models a calculator through a slot in the door. The model doesn’t suddenly become a calculator, it just knows how to type numbers into it to get an exact answer.
The model decides whether to call a tool based entirely on its description and the user’s prompt. This is why, the description is very important. If the description is vague or too generic, the model might call it at the wrong time or not at all. Be specific about what the tool does and when it should be used.
The another approach is to use tool in conjunction with instruction. You can tell the model in your session instruction exactly when and how to use your tools, which gives you fine-grained control over the behaviour.
Maintaining Recent Conversation with Transcripts
We already know that a LanguageModelSession keeps context, you can ask a follow-up question and the model remembers what it said before. But there’s a catch that becomes very real, very quickly with an on-device model, the context window is small.
Cloud models like GPT-4 or Claude can hold hundreds of thousands of tokens in memory at once. Apple’s on-device model has a much tighter budget, roughly a few thousand tokens. That means if your user has a long back-and-forth conversation, the session will eventually run out of room, and older messages will be pushed out or you’ll hit an error.
This is where the transcript comes in.
What Is a Transcript?
Every LanguageModelSession maintains a transcript, a record of the full conversation so far, as an array of entries. Each entry is either a user prompt or a model response (plus any tool calls in between). You can read it at any time:
let session = LanguageModelSession()

_ = try await session.respond(to: "What is a good pre-workout meal?")
_ = try await session.respond(to: "How many calories does that have?")

print(session.transcript)
// [.prompt("What is a good pre-workout meal?"), .response("..."), .prompt("How many calories..."), .response("...")]
On its own, that’s just an observation tool. The interesting part is what you can do with it.
Restoring a Session from a Transcript
You can pass a transcript to a new session when you create it. This lets you restore conversation context, either after the app was backgrounded, after a restart, or after you’ve trimmed old entries to free up space
// Save the current transcript entries
let savedEntries = session.transcript.entries

// Later — create a new session with those entries already loaded
let restoredSession = LanguageModelSession(
    instructions: instruction,
    transcript: Transcript(entries: savedEntries)
)

// The model picks up right where the conversation left off
let response = try await restoredSession.respond(to: "What was that meal you suggested?")
You can also persist savedEntries to disk (they’re Codable) so the conversation survives an app restart. Users open the app the next day and the model still knows what they discussed. Or you can allow users to summarise what they’ve chatted so far (again, let the model summarise the transcript, and store it somewhere) and override your locally stored transcript to save up space, while keep context as much as possible.
A good rule of thumb: keep the last 4–6 turns. That’s enough for the model to follow what was just discussed without blowing the context budget on a conversation from ten minutes ago.
Building an Agentic Feature
The nutrition app works great with what we have built so far. But a tension shows up the moment you want the app to do more than one kind of thing.
Think about what a user actually wants. First, quick creative meal ideas, fast on-device back-and-forth. Then at some point, a real plan, a full week optimised around their goals, budget, and macros, with actual nutritional reasoning behind it. Now, those are two completely different needs, different models, different instructions, different tools, and different generation parameters. But they need to share the same conversation history so the deep analysis picks up exactly where the casual chat left off.
Managing two separate sessions and copying context between them manually is painful. Fear not, Apple’s answer is Dynamic Profiles, a declarative, SwiftUI-flavoured API (I bet this is the future shape of Swift-y APIs???) where you define all your possible session configurations in one place, and the framework resolves which one is active based on your app’s current state. One session, multiple modes, automatic transitions, sounds good, right?
DynamicInstructions: Reusable Building Blocks
Before building the full profile, there’s a smaller piece worth knowing, DynamicInstructions. It bundles related instructions and tools into a self-contained, reusable component. Think of it as a SwiftUI view for session context. Compose it into a larger profile the same way you’d nest views.
struct NutritionSkills: DynamicInstructions {
    var isPremiumUser: Bool

    var body: some DynamicInstructions {
        Instructions("Help users plan nutritious, budget-friendly Vietnamese meals.")

        if isPremiumUser {
            Instructions("Provide detailed macro and micronutrient breakdowns.")
            CalorieLookupTool()
        }
    }
}
One small note from the WWDC session
Put conditional content at the end of the body. The static instructions at the top are cache-friendly. The model reuses its computation for them on every prompt, and only re-processes the conditional additions. Flipping this order wastes that caching benefit.
One Session, Many Agents via DynamicProfile
Now the full profile. You conform a struct to LanguageModelSession.DynamicProfile and return the active Profile from body. The framework re-evaluates body on every prompt, so updating a property on the profile automatically switches the session’s persona.
@Observable
class NutritionOrchestrator {
    var mode: Mode = .mealPlanning
    var isPremiumUser = true
    let systemModel = SystemLanguageModel.default
    let pccModel = PrivateCloudComputeLanguageModel.default

    enum Mode { case mealPlanning, deepAnalysis }
}

struct NutritionAssistantProfile: LanguageModelSession.DynamicProfile {
    var orchestrator: NutritionOrchestrator

    var body: some DynamicProfile {
        switch orchestrator.mode {
        case .mealPlanning:
            Profile {
                NutritionSkills(isPremiumUser: orchestrator.isPremiumUser)
            }
            .model(orchestrator.systemModel)
            .temperature(1)

        case .deepAnalysis:
            Profile {
                Instructions("""
                    You are a nutrition strategist. Given the user's goals, age, \
                    weight, and budget, reason through their daily calorie and macro \
                    targets, then recommend an optimal weekly meal plan.
                    """)
            }
            .model(orchestrator.pccModel)
            .reasoningLevel(.deep)
        }
    }
}
You may notice NutritionOrchestrator is an observable object. Inside DynamicProfile's body, it will re-evaluate just like your SwiftUI's view body.
Meal planning uses SystemLanguageModel with temperature(1), which gives the model a bit of creative latitude so suggestions feel varied and interesting. Deep analysis uses PrivateCloudComputeLanguageModel with reasoningLevel(.deep), so the model works through the nutrition maths carefully before answering.
Pass the profile when creating the session. That’s it!
let orchestrator = NutritionOrchestrator()
let session = LanguageModelSession(
    profile: NutritionAssistantProfile(orchestrator: orchestrator)
)

// Phase 1 — on-device, fast, creative
let suggestions = try await session.respond(
    to: "Suggest three affordable high-protein meals I can prep in 15 minutes."
).content

// Switch modes — transcript stays intact, profile adapts
orchestrator.mode = .deepAnalysis

// Phase 2 — PCC with deep reasoning, full Phase 1 context still visible
let plan = try await session.respond(
    to: "Based on those meals, work out my daily macro targets to lose 5 kg in 3 months. I'm 28, male, 75 kg, moderately active."
).content
The deep analysis model can see everything from Phase 1. No manual context transfer, no second session to manage. The profile switched, but the conversation didn’t.
Managing Transcript Between Models
When you switch from PCC to the on-device model, context window sizes differ. PCC offers a generous context window, but SystemLanguageModel is much tighter. A long conversation can blow past it.
This is why Apple introduces a new modifier called historyTransform. It applies a transform over the session’s history right before the model is prompted, without permanently touching the transcript. The actual session stays intact, but the model gets a trimmed view for that one request.
A safe default: drop completed tool calls. They served their purpose and don’t need to sit in the window forever.
case .mealPlanning:
    Profile {
        NutritionSkills(isPremiumUser: orchestrator.isPremiumUser)
    }
    .model(orchestrator.systemModel)
    .temperature(1)
    .historyTransform { history in
        guard let lastResponseIdx = history.indices.last(where: {
            history[$0].role == .assistant
        }) else {
            return history
        }
        let trimmed = history[0 ..< lastResponseIdx].filter { $0.role != .tool }
        return trimmed + history[lastResponseIdx...]
    }
Custom Profile Modifiers
Just like you can add view modifiers to your SwiftUI view, if you apply the same transform across multiple profiles, you may package it as a reusable DynamicProfileModifier. Let’s take a look at how we can create a custom modifier.
struct DroppingCompletedToolCalls: LanguageModelSession.DynamicProfileModifier {
    func body(content: Content) -> some DynamicProfile {
        content.historyTransform { history in
            guard let lastResponseIdx = history.indices.last(where: {
                history[$0].role == .assistant
            }) else {
                return history
            }
            let trimmed = history[0 ..< lastResponseIdx].filter { $0.role != .tool }
            return trimmed + history[lastResponseIdx...]
        }
    }
}

extension LanguageModelSession.DynamicProfile {
    func droppingCompletedToolCalls() -> some DynamicProfile {
        self.modifier(DroppingCompletedToolCalls())
    }
}
Any profile can now call .droppingCompletedToolCalls() the same way you’d call something like .padding() on a view.
Running Code at Response Boundaries
History transforms are non-destructive. They never change the actual transcript. Sometimes you want to permanently trim it once it grows too long. That’s where lifecycle modifiers come in. As the name suggests, it allows you to execute custom logics during each agentic session’s lifecycle hooks.
For example, onResponse runs after each completed model response. It’s a clean boundary for checking transcript length and taking action. Pair it with a custom session property to store a running summary, and you can keep long conversations healthy without losing important context.
extension SessionPropertyValues {
    @SessionPropertyEntry var conversationSummary: String?
}

struct NutritionAssistantProfile: LanguageModelSession.DynamicProfile {
    @SessionProperty(\.history) var history
    @SessionProperty(\.conversationSummary) var summary
    var orchestrator: NutritionOrchestrator

    var body: some DynamicProfile {
        switch orchestrator.mode {
        case .deepAnalysis:
            Profile {
                Instructions("You are a nutrition strategist...")
                if let summary {
                    Instructions("Summary of earlier conversation: \(summary)")
                }
            }
            .model(orchestrator.pccModel)
            .reasoningLevel(.deep)
            .onResponse {
                guard history.count > 50 else { return }
                let cutIndex = history.index(history.startIndex, offsetBy: 40)
                summary = try await summarize(Array(history[..<cutIndex]))
                history = Array(history[cutIndex...])
            }
        default:
            Profile {
                NutritionSkills(isPremiumUser: orchestrator.isPremiumUser)
            }
            .model(orchestrator.systemModel)
        }
    }
}
There are two important caveats to cover before we move forward. First, history is lossy and shared across all profiles, so once you trim it, every profile in the session sees the trimmed version. For a profile-specific view that doesn’t affect others, use historyTransform instead. Second, only mutate the transcript when session.isResponding is false. Touching it mid-response is a programmer error.
Agent Orchestration Patterns
With multiple profiles in play, the model needs a way to decide when to switch between them. Apple describes two patterns during WWDC26 session : baton-pass and phone-a-friend. I will be using profile and agent interchangeably throughout this section.
Baton-Pass
In baton-pass, profiles share the full transcript. You give each profile a tool that the model can call to hand control to the next profile. A lifecycle modifier catches the tool call and updates the active mode.
The nutrition app is a natural fit. The casual meal-planning agent calls a handoff tool when it detects the user wants a deep nutrition analysis. The deep analysis agent hands back once it’s done.
struct NutritionAssistantProfile: LanguageModelSession.DynamicProfile {
    var orchestrator: NutritionOrchestrator

    var body: some DynamicProfile {
        switch orchestrator.mode {
        case .mealPlanning:
            Profile {
                NutritionSkills(isPremiumUser: orchestrator.isPremiumUser)
                RequestDeepAnalysisTool()
            }
            .model(orchestrator.systemModel)
            .onToolCall { orchestrator.mode = .deepAnalysis }

        case .deepAnalysis:
            Profile {
                Instructions("You are a nutrition strategist...")
                ReturnToMealPlanningTool()
            }
            .model(orchestrator.pccModel)
            .reasoningLevel(.deep)
            .onToolCall { orchestrator.mode = .mealPlanning }
        }
    }
}
The key thing to remember: both profiles see the same full transcript. The agent that receives the baton can read everything that came before. No context is lost in the handoff.
Phone-a-Friend
Phone-a-friend is for focused consultations where you don’t want the specialist’s reasoning chain to clutter the main session. The tool spins up a short-lived child session, asks a specific question, returns the answer as tool output, and the child session disappears. It leaves no trace in the parent’s history.
struct CalorieConsultationTool: Tool {
    let name = "consultNutritionSpecialist"
    let description = "Consults a specialist for a detailed calorie breakdown of a specific meal."

    @Generable
    struct Parameters {
        @Guide(description: "The full meal description to analyse")
        var meal: String
    }

    func call(arguments: Parameters) async throws -> ToolOutput {
        let specialist = LanguageModelSession(
            instructions: "You are a clinical nutrition specialist. Provide concise, accurate calorie and macro data only."
        )
        let response = try await specialist.respond(
            to: "Analyse calories and macros in: \(arguments.meal)"
        )
        return ToolOutput(response.content)
    }
}
Use baton-pass when profiles need shared history and one agent genuinely hands the conversation to another. Use phone-a-friend when you need a specialist that shouldn’t leave its reasoning chain in the main session.
Tool Calling Mode
By default, the model decides whether to call a tool or respond directly. ToolCallingMode lets you override that. Let’s take a look at all the modes available today:
.allowed— the default. Model calls tools or responds directly, its choice..disallowed— tools are off entirely. Useful when the user navigates somewhere where the session’s tools are irrelevant..required— the model must call a tool. No direct text responses.
.required is useful for building structured action loops, but it comes with a hard rule: you must provide an exit condition. A clean approach is a final-answer tool that throws to escape the loop:
struct NutritionPlanningProfile: LanguageModelSession.DynamicProfile {
    var body: some DynamicProfile {
        Profile {
            Instructions("Gather all nutritional data needed, then deliver the final plan.")
            NutritionDatabaseTool()
            CalorieLookupTool()
            FinalisePlanTool() // throws FinalAnswerError to break the loop
        }
        .toolCallingMode(.required)
    }
}
Error Handling
By default, when a tool throws an error or you cancel a response, the session’s transcript rolls back to its state before the request. You get a clean slate to retry from. For advanced use cases like cancelling mid-response and resuming from that point, you need the transcript to stay as-is:
// Per profile
struct NutritionAssistantProfile: LanguageModelSession.DynamicProfile {
    var body: some DynamicProfile {
        Profile { ... }
            .transcriptErrorHandlingPolicy(.preserveTranscript)
    }
}

// Or directly on the session
session.transcriptErrorHandlingPolicy = .preserveTranscript
With .preserveTranscript, cleaning up the transcript before continuing is your responsibility. The transcript property on LanguageModelSession is now mutable for exactly this purpose, but only modify it when session.isResponding is false.
A Note on KV Caching and Performance
Transcript mutations have real latency consequences, and it’s worth understanding why before you start aggressively rewriting history.
Large language models maintain a KV cache that stores intermediate computation from the prompt. Appending to the transcript, which is what a normal response does, preserves that cache. The model picks up where it left off, and time-to-first-token stays fast.
Removing entries, swapping tools, or updating instructions invalidates the cache. The model has to reprocess everything from scratch, which adds latency. What looks like a quick trim can easily turn a 200ms response into an 800ms one.
If I understand it correctly, the advice from Apple is that prefer append-only behaviour where you can, and only mutate the transcript when the benefit is worth the cost. When you do mutate, measure with the Foundation Models Instrument in Xcode rather than guessing, because different models have different caching characteristics.
One accuracy risk worth flagging: if you add a tool to the session after the model has already responded without it, the model may skip the tool next time. It “learned” from history that direct responses are fine. Context engineering changes are worth testing with real evaluation sets, not just assumed to work.
Conclusion
We covered a lot of ground here. From a basic LanguageModelSession handshake all the way to multi-agent orchestration with baton-pass and phone-a-friend patterns. That’s quite a journey for a framework that, not too long ago, I had filed under “not my problem.”
A few things worth keeping in mind before I wrap up. The agentic capabilities, DynamicProfile, DynamicInstructions, lifecycle modifiers, are all WWDC26 announcements and currently beta software. The APIs may shift before the final SDK ships. Build with that in mind, and keep an eye on the release notes.
What I find genuinely exciting is the direction Apple is heading here. Third-party model providers plugging into the same LanguageModel protocol. A full on-device RAG story via SpotlightSearchTool. A SwiftUI-flavoured API for orchestrating multiple agents within a single session. It’s a proper toolkit for building agents that reason, act, and adapt, all without leaving the Apple ecosystem.
There are a few other things I deliberately left out of this article because they each deserve their own treatment: the Evaluations framework for testing AI features properly, the Guardrails and the Foundation Models CLI for iterating on prompts outside of Xcode. Both are worth exploring in depth, and I’ll be writing about them separately. Stay tuned for those.
If this article got you curious and you want a structured map of everything, from your first LanguageModelSession to shipping a real agentic app, I put together a dedicated learning path that organises all the topics covered here (and beyond) into a step-by-step visual guide. Each node links back to the relevant section of this article, plus WWDC sessions and Apple docs.
→ The Swift Developer’s Path to On-Device AI Agents
References
Meet the Foundation Models framework
What’s new in the Foundation Models framework
Build agentic app experiences with the Foundation Models framework
Build with the new Apple Foundation Model on Private Cloud Compute
Comments are powered by Giscus (GitHub Discussions). Loading them fetches resources from GitHub.